A simple change of background can turn a disappointing wildlife photo into a great one. Professional wildlife photographers think about backgrounds all the time and do everything they can to improve the background. Less experienced wildlife photographers are so excited to find an interesting creature that they give the background precious little thought.
This is the third in an ongoing series of articles on Snowy Owl photography. Originally posted March 1, 2016. Revised and re-posted Jan. 2, 2018. Updated January 10, 2019.
The Importance of Backgrounds
Experienced photographers are always checking the backgrounds of their images. Sometimes you want a nice “clean” background. Other times you want a complementary or contrasting background. A wildflower photographer will walk all the way around a flower to decide on the best background, and go a step farther by trying high, medium, and low camera angles – even going so far as to put the camera on the ground if that will result in the best image.
Portrait and fashion photographers are always checking backgrounds, looking for something that is complementary to the model.
Wildlife photographers do the same thing. This Least Chipmunk had several favorite eating spots. I chose this spot to create an image because it gave me the softest, most natural background.
There are some situations where you have no choice. The animal is where it is and you are where you are, so you can’t change the background. But there are more opportunities to change the background than the average photographer thinks about. At Rocky Mountain National Park dozens of tourists were scattered along a road photographing a herd of elk browsing in the grass. Some of the elk were in front of a tall metal fence and others were in front of trees and bushes. People just hopped out of their cars and started taking pictures with no apparent thought to the background. There was plenty of room to move around and plenty of space between people. Walking as little as 20 feet one way or the other could make the difference between a good background and a bad one.
Snowy Owl Photo Locations
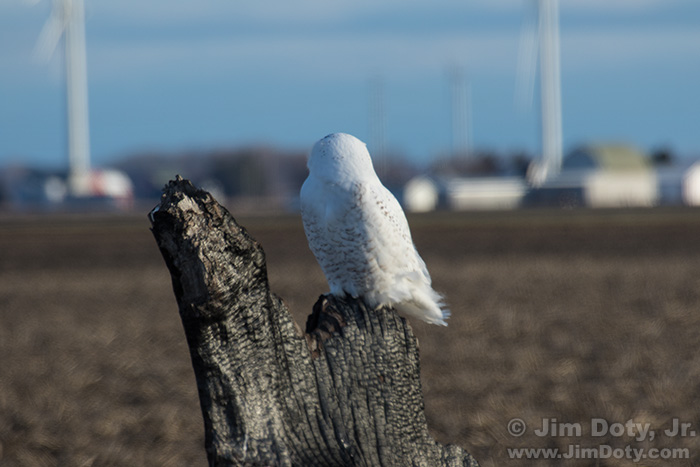
 The Snowy Owl in these images was on the burned stump of a downed tree (marked on this satellite map with a red “O”). For my first set of photos (image at the top of this article) I pulled up on the side of the road at my first photo location (red “P1”) and took pictures out the right front passenger window. I knew the background was distracting and my location wasn’t a very good one, but I didn’t know if this was a nervous owl or a calm one and I wanted to get a few images “in the can” in case the owl bolted. It turned out this was a very calm owl. Your first impulse should be to get the shot. Your second impulse should be to improve it.
I wanted a better background and there were trees off in the distance near the road, so I backed up and crossed the small bridge to my next photo location (red “P2”). This is a big improvement over location P1, and I am now shooting out the driver’s side window so I can rest my elbows on the window ledge if I want too, giving me more stability. But I didn’t like the blue barn roof in the lower right corner. That could easily be cropped out but the owl against the tree wasn’t quite what I wanted either. A solid row of dark trees would be better behind the white owl, but that isn’t what I had to work with. I am also losing light due to some thin clouds covering the sun.
The owl was doing just fine. In fact I had to wait until the owl would look back my way to take pictures. It helps if you learn a trick from Dewitt Jones and talk to the animal. So I kept up a conversation with the owl in a low calm voice. They owl seemed to check me out more often if I kept talking. Don’t make loud noises. Don’t clap or whistle. Just keep talking softly.
Experimenting with the background, I pulled the car forward a few inches to put the owl between the trees (still the red “P2″ on the map”). This looked better to my eye, but still not what I wanted.
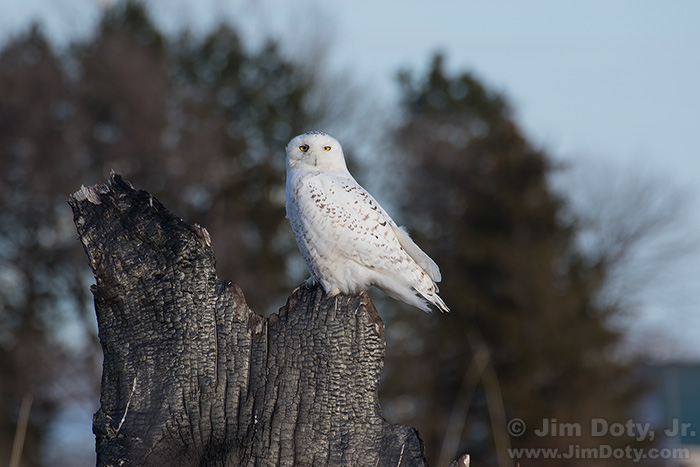
The sky was clearing to the left of the trees in the background, giving me more blue and a a darker blue. I pulled the car forward several feet to my third location (red “P3”). Now we are talking! This is far and away the best background for the image I wanted. Some judicious cropping to leave out the blurry tree in the foreground and I have a fine image. Best of all, the sun dropped below the thin veil of clouds so I got some of my light back.
I didn’t like blurry tree but the only way to eliminate it was to get the camera up higher. That would mean getting out of the car and the owl would most likely leave. So I took plenty of images from inside the car to make sure I nailed the shot, being as steady as I could possibly be. It was breezy enough that occasional gusts would move the car, blurring some of my photos just a bit. So I kept at it until the owl left.
The Snowy Owl decided to move on, so I grabbed my iPhone to take a snapshot from photo location P3. The owl was on the stump on the right side of the image.
Looking at all four images together gives you a good idea of the significant difference the background makes.
With some judicious cropping it all comes together!
The Snowy Owl Series
“How To†Series: Snowy Owl Photography – An Overview
How to Find and Photograph Snowy Owls
Snowy Owl Photography: Control the Background for Better Images
Snowy Owl Photography: Solving A Photo Problem (And the Right Way to Exit Your Vehicle)
More Links
“How To†Series: Winter Photography – An Overview with article links
Related Article Links
Metering Wildlife in the Snow, Part One
Metering Wildlife in the Snow, Part Two
How To Find Wildlife, The Best Books
How To Photograph Wildlife, The Best Books
How to Be A Better Wildlife (and Nature) Photographer
If you want to spend a weekend learning how to be a better nature photographer, I do workshops in Colorado and Michigan. A complete list of workshops is at JimDoty.com.


