How do you photograph the Milky Way, that milky band of light across the night sky that has our galaxy’s brightest concentration of light? With a wide angle lens and a tripod it is simple if you know a few tricks. Finding a dark enough sky is more of a problem.
The short version. Pick a site with the darkest sky you can find, far from city lights. With your camera on a tripod with a wide angle lens, set your camera to capture RAW files (or RAW + Jpeg), choose a fairly high ISO (ISO 800 up to ISO 6400), stop the lens down 1 stop from its widest aperture, focus the lens on infinity, choose a shutter speed of 15 to 30 seconds and take a picture. Experiment and have fun! It is as simple as that, more or less. If it is breezy, use your car, or your body or something to block the breeze. If it is windy, forget it. Oh, remember to take a small flashlight.
Let’s look at these one at a time with some explanations about each one..
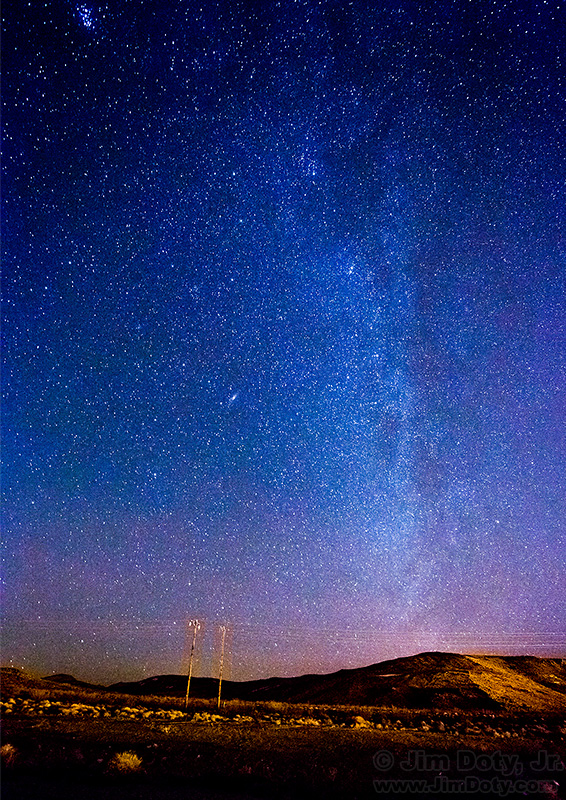
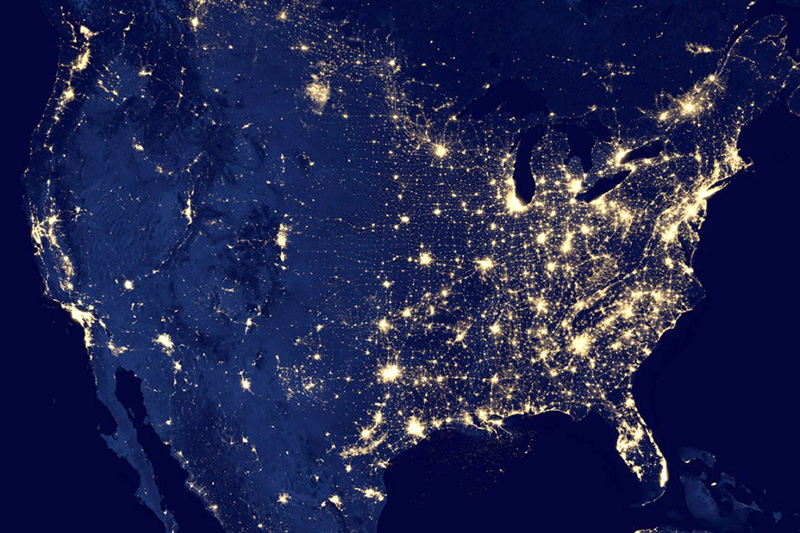
Find a dark sky. There is a lot of light out there from city’s all across the country. Most of the darkest skies are in the western U.S. If you are within 50 miles of a small city or 100 miles of a large city, you will get sky fog in your photos, so get as far away from cities as you can and give it a go. Some of the darkest skies I’ve experienced are in Michigan’s Upper Peninsula (away from St. Ignace and the Soo), western Nebraska, western Colorado, southern Utah, west Texas, and southern New Mexico. The photo at the beginning of this article was taken in the middle of California’s Mojave Desert. The pink glow above the horizon is from Barstow (population 23,000), 40 miles away. The yellowish light in the foreground is from Fort Irwin, about a mile away to camera right. (Behind me I could see the glow on the horizon from Las Vegas, well over 100 miles away.) It wasn’t one of the darker places I’ve been, but it was where I happened to be and the sky was much darker than back home in central Ohio. Pick a night or time of night when the moon isn’t up (see The Photographer’s Ephemeris in the links section below).
Put your camera on a good quality tripod with a good quality tripod head. This allows you to use long shutter speeds without having a blurry photo. You can also nestle your camera into a bean bag, or put it on a fence post, or put it on the roof of your car and prop the lens up to the angle you want (turn the motor off).
Use a wide angle lens. The earth is rotating so the stars will streak across the sky during a long exposure. The wider the focal length you use (along with the right shutter speeds), the more you can minimize the streaking.
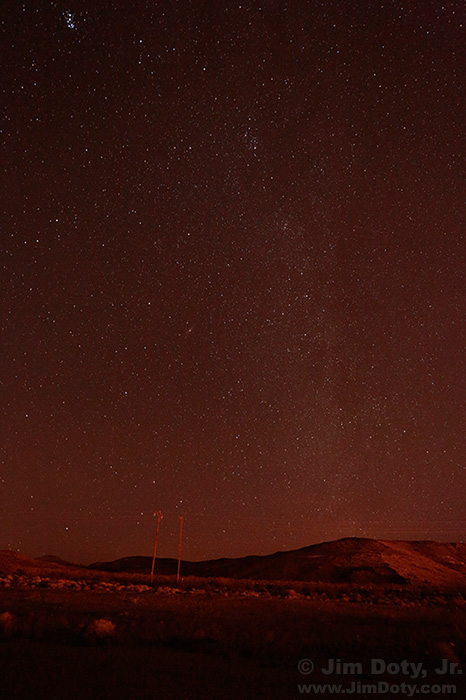
Set your camera to capture RAW or RAW + Jpeg files. When you take photos of the night sky the original captures will look red (see the photo below), nothing like the night sky looks to the naked eye. If you shoot RAW files, you can use Adobe Camera Raw (ACR) to shift the white balance so the sky turns from red to a neutral or bluish tint to suit your taste. A RAW file and ACR allows you to do this with minimal damage to the image quality. Use ACR to boost the exposure in the RAW file which you will need to do for the Milky Way to show up. Use ACR to increase the contrast and darken the darker pixels. You may also want to lighten the lighter pixels. Play with the ACR sliders until the photo looks like you want it to look. A RAW file and ACR will also allow you to reduce luminance noise in the photo which is a result of using a high ISO setting. ACR comes with Photoshop Elements and Adobe Photoshop. The photo at the top was processed with ACR from a RAW file. If you don’t shoot RAW files, set the white balance on your camera to “Daylight”. Use your favorite imaging editing software to adjust your Jpeg file (see the photo below). Change the color balance of the Jpeg file with Levels, Curves, or Hue Saturation and adjust the contrast with Levels and Curves. You can also use noise reduction software like Neat Image (there is a free version) or Noise Ninja to remove the digital noise from your photo.
Choose a high ISO (ISO 800 to ISO 6400). A high ISO setting will allow you to use a faster shutter speed. For the top photo, the ISO was set to 6400.
Stop the lens down 1 stop from its widest aperture. Lenses reveal their design flaws (they all have them) at the widest aperture setting. Coma, chromatic aberration, and other optical gremlins will show up toward the edges of the frame if you shoot wide open. Stopping down one stop will help minimize these design flaws. If the widest aperture on your lens is f/2.8, shoot at f/4. If the widest aperture is f/4, shoot at f/5.6.
Focus the lens on infinity. With a prime (single focal length) lens, this is easy. Just turn the focus ring to infinity. Many zoom lenses focus past infinity so this is more of a challenge. If you turn the focus ring until it stops (which is past infinity) you will end up with an out of focus photo. You will not be able to look through your camera at night and arrive at an accurate manual focus on the stars. And forget about autofocus. There is a little “L” shaped symbol on a zoom lens that shows where you can go “to infinity and beyond” (apologies to Buzz Lightyear). Set your zoom lens to its widest focal length, go outside in the daytime and focus on the most distant object you can see. Then check where the focus mark is in relation to the L symbol. When you are out shooting the sky at night, use your flashlight to line up the focus mark in the exact same relationship to the L symbol.
Choose a shutter speed of 15 to 30 seconds.  With a wide focal length lens (24mm and wider), a shutter speed of 15 to 30 seconds will minimize star streaking due to the rotation of the earth. Feel free to try 4 and 8 seconds too.
Experiment. Try different ISO settings (from ISO 400 all the way up to ISO 6400) and different shutter speeds (from 4 seconds to 30 seconds). You’ve got nothing to lose and you can learn by doing. The advice above is for a dark sky. If your sky isn’t so dark you won’t be able to use the higher ISOs and longer shutter speeds due to sky fog. You may not be able to capture the Milky Way but you can still get some interesting night sky photos. Be sure an include an interesting foreground (mountains, hills, trees, a windmill) if that is possible from your location.
Incidentally, the camera was level. The ground slopes and the utility poles lean a bit so it sure makes the photo look crooked.
Photo Info: The Milky Way Over the Mojave Desert looking generally northwest. The Pleiades star cluster is at the top left. The Andromeda Galaxy (our nearest galactic neighbor at 2.5 million light years away) is above the utility poles about 1/3 up from the horizon. It is bright in the center with an elongated smudge. Canon 5D Mark III, Canon EF 17-40mm lens at 17 mm. 30 sec, f/5.6, ISO 6400.
Links
To learn more about photographing the night sky, plus photographing the moon, moonlit landscapes, star trails, city lights at night, fireworks, and lightning, read chapter 17 in Digital Photography Exposure for Dummies. You can learn more about the contents here, and order it at Amazon.com.
The best astrophotography books.
The Photographer’s Ephemeris. Software for determining the time and direction of moonrise, moonset, sunrise, and sunset, for any day of the year from anywhere on the planet. The desktop version (Windows or Mac) is free. The iPhone app (small fee) is one of my favorites.


