Compared to the human eye, digital cameras have a very limited dynamic range. Your digital camera simply can’t capture the range of tones from light to dark that your eyes can see. That is why HDR photography has become so popular with so many photographers, and absolutely essential for some commercial photographers.
Update, November 19, 2017: A revised version of this article is here.
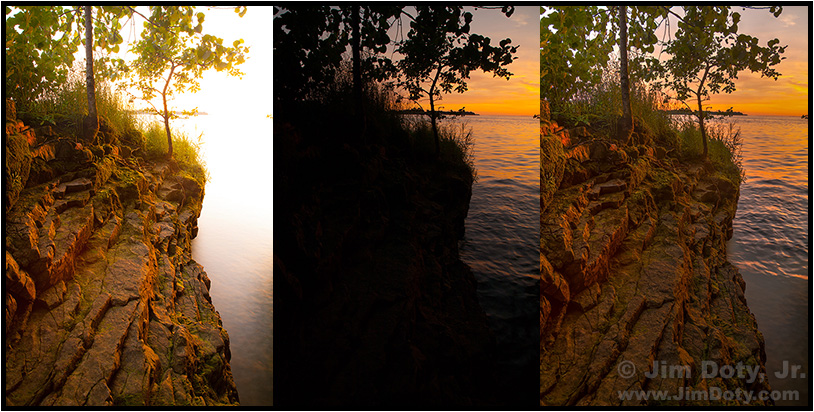
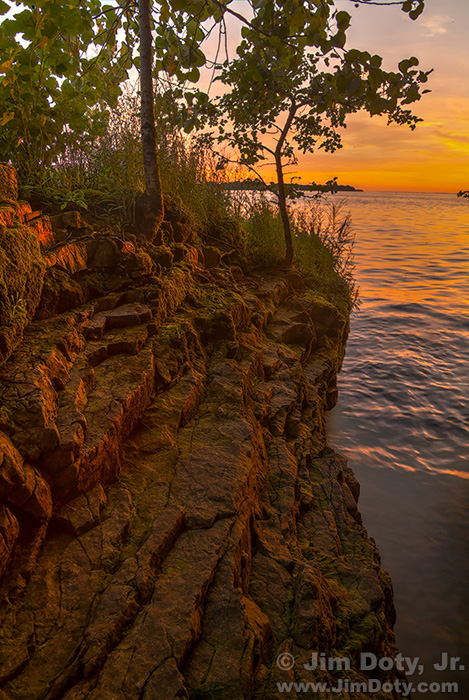
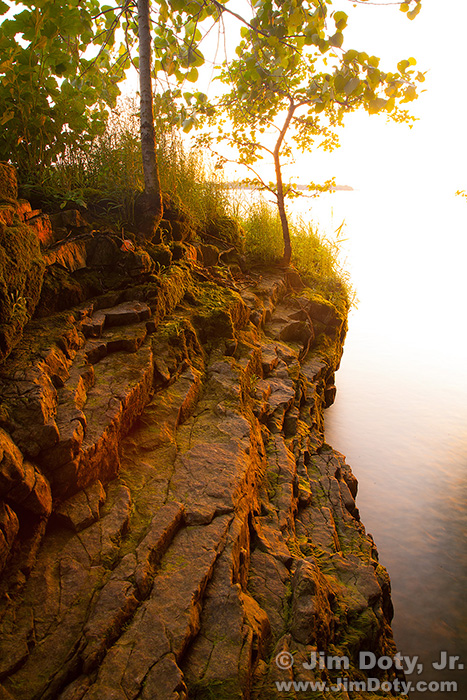
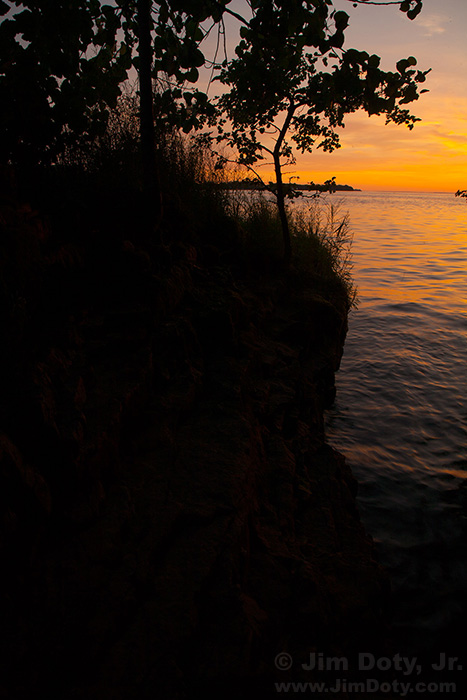
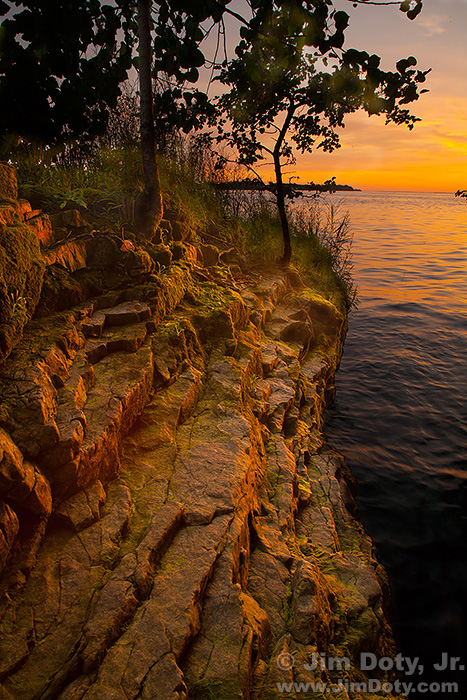
Sunrise, Gibraltar Island. Two exposures (left and center) combined to make a third image (right). Click to see a larger version.
In a high contrast situation, human vision can see a white subject in the sun and a black subject in the shade, all at the same time. But a digital camera is much more limited. If you expose for the sunlit area of a high contrast scene, the shady areas of the scene go very dark or black in the photograph. If you expose for the shady areas of the scene, the sunlit areas are washed out or white in the photograph. Your eyes can take it all in but the camera can’t. At least not in a single image.
The solution, at least in concept, is simple. Take two or more exposures of the same scene (without moving the camera) that capture the whole range of tones in the scene and put them together later in a computer (or on the spot in the camera). The actual application of the concept is a little more complex.
Jeremy Bruskotter and I were leading a sunrise field trip for OSU’s annual photography workshop on Gibraltar Island. The dynamic range of the scene was very high in contrast, far beyond the dynamic range of our digital cameras.
I chose an aperture of f/20 which would give me enough depth of field (near to far sharpness) for the whole image. I metered just the sky and then just the rocks to predetermine the two shutter speeds I would need for the best exposures. Then I put the camera on a tripod to insure the camera didn’t move between exposures. I focused on the hyperfocal distance (again to be sure I had enough depth of field) and turned off autofocus to make sure the focus didn’t change. I turned mirror lockup on to be sure there was no blurring of the image due to mirror slap during the long shutter speeds. I looked through the viewfinder and pressed the depth of field preview button as a final check that everything would look like I wanted it to look.
My first exposure was 8 seconds based on the predetermined shutter speed for the rocks. I clicked the shutter at 6:23:45 am. The rocks look fine. The water and sky are totally blown out.
My exposure for the sky and water was 1/8 second. I clicked the shutter at 6:24:13 am. The sky and water look just fine while the rocks are seriously underexposed. I took additional exposures just for insurance but these two ended up being the best.
The simple part was combining the two exposures with Photomatix Pro software. I could have used more exposures but I wanted to see how the software would do with just two exposures. I opened the two images in Photomatix, picked the preset that looked the most natural, tweaked the settings a bit, and saved the image. It took less than 5 minutes.
What about cameras that have a built in HDR setting? They work well in some situations. If you have an HDR setting on your camera I highly recommend you try it. Sometimes it works very well, sometime not so well. The higher the dynamic range in the scene, the less effective the results are with the HDR setting in the camera. In situations where your camera just can’t get the job done, HDR software does a terrific job. And cameras using the HDR setting don’t give you anywhere near the control over the final output as you get with HDR software on your computer.
I highly recommend Photomatix Pro HDR software to combine your images. It is stand alone software that will do its own thing without needing any other software. If you use Adobe software you do have the option of using Photomatix as a plug in for Lightroom and/or Photoshop.
If you get or already have Photomatix software, get the book Fine Art Photography: High Dynamic Range: Realism, Superrealism, & Image Optimization for Serious Novices to Advanced Digital Photographers by Tony Sweet. (Yes, I think the title is very long, but it is highly descriptive.)Â Most of the book is devoted to taking you through a bunch of examples using Photomatix, and showing you which settings Sweet used to get the various effects in the combined images. This book is a great introduction to using Photomatix and I give it my highest recommendation. It will really speed up your learning curve.
Some people don’t like HDR photography because the results they have seen look garish and over the top. It doesn’t have to be that way. Tony Sweet shows you how to get natural looking HDR images. And if you happen to like garish and over the top, he shows you how to do that too. The point is you can learn to get the results you like, no matter what other photographers are doing. Photography is still, after all, a matter of personal artistic taste.
HDR: The Basic Steps
1. Choose the composition for your scene, including the lens focal length you will use.
2. Determine the depth of field you will need (the nearest and farthest points you want to be in focus in the final image).
3. Use a hyperfocal distance chart to determine the aperture you will need and where you will focus your lens (the “hyperfocal distance”) based on the focal length you want to use (step 1) to get the depth of field you will need (step 2). Make sure the hyperfocal distance chart is specifically designed for the size of the sensor in your camera and the largest size print you want to make. Hyperfocal distance charts are not universal for all sensor sizes and all print sizes. Most hyperfocal distance charts are designed for 8×10 inch prints which makes them totally inadequate for making 11×16 and larger prints from your digital files. See Digital Photography Exposure for Dummies in the links below for more information.
4. Set the lens aperture you will need based on the results of step 3.
5. In manual mode, meter the lightest and darkest tones in your scene to determine the fastest and slowest shutter speeds you will need to use to get a good exposure for these tones. If you haven’t mastered metering using your camera’s manual exposure mode, check out my book in the links section below.
6. Put your camera on a tripod, focus the lens at the hyperfocal distance (step 3) and then turn autofocus off. Turn mirror lockup on if you will be using any shutter speeds between 1/30 second and 1 second (which is usually the case when doing HDR photography). If you use any shutter speeds slower than 1/60 second, use a cable release or the camera’s self-timer to fire your camera.
7. Take a series of exposures from your fastest to your slowest shutter speeds (step 5) in one or at most two stop intervals. Do not move the camera. Do not change the aperture. Do not change the focus. Do not bump the tripod. If you accidentally do any of these things, start step over again at step 6.
8. Process your series of images in high quality HDR software like Photomatix Pro.
Other Software Options
Nik HDR Efex Pro is another highly respected HDR software package worth considering. Like Photomatix Pro, it is a favorite for professional photographers. It usually sells for a $129, $30 more than the current price for Photomatix Pro. Tony Sweet also covers this software in the book I recommend above and link to below. I do not have any personal experience with Nik HDR Efex Pro so I can’t give it a hands on recommendation.
What about using software with layers? If you have software that allows you to work with layers (like Photoshop and Photoshop Elements) you can put the two exposures on top of each other as separate layers and combine the best part of both images using layer masks. It takes some time to master layer masking but it is well worth your while for tasks other than HDR photography. With some scenes, layer masking HDR exposures works quite well and you don’t need special HDR software like Photomatix. But in a complex scene like the one above, you could spend 30 to 60 minutes or more combining the exposures of a scene with layer masks and still not end up with results that aren’t any better than what Photomatix can give you in 5 minutes or less. Sometimes you will work in Photomatix quite a bit longer than 5 minutes, but most of the time Photomatix will save you hours of time doing HDR images as compared to layer masks with Photoshop Elements or Photoshop. At some point you have to ask yourself what your time is worth.
It is true the most recent versions of Photoshop have an HDR feature without going through the layers and masking process, but the results are not so elegant as the results with Photomatix, and they usually take longer to achieve. There is a reason so many photographers have the latest version of Photoshop and they still prefer to use Photomatix Pro. It all comes down to time and quality.
Photo Data: Canon 5D on a tripod. Canon EF24-105mm f/4L IS USM lens at 24 mm. Exposure for the rocks: 8.0 sec, f/20, ISO 100. Exposure for the sky and water: 1/8 sec, f/20, ISO 100.
Links
Article: How to Create Realistic HDR Images with Adobe Camera Raw
Article: Giving Yourself Options: HDR Photography
Buy Photomatix Pro 6.
Article: The Best Image Editing Software
This is one in a series of articles that will guide you to the best of all things photographic. The rest are here: Buyer’s Guide: Recommendations For The Best Photography Equipment, Software, Books, Magazines, DVDs, Online Photo Labs and More.
You need to understand metering, manual exposure, depth of field, and hyperfocal distance charts if you want to get the best results in your HDR imaging. I recommend my own book, Digital Photography Exposure for Dummies. This is not your typical Dummies book and it is used in university level photography classes amd workshops. It is one of the highest rated photography books at Amazon.com. It is highly recommended by photography magazines, professional photographers, advanced amateurs, and beginning photographers. In addition to covering the basics of exposure, it goes into intermediate and advanced exposure techniques most books barely mention, much less cover in depth. For example, try and find another exposure book that tells you how to custom design your own hyperfocal distance chart (or even how to use one) for your camera sensor and the size prints you want to make. Learn more here and order it at Amazon.com.

