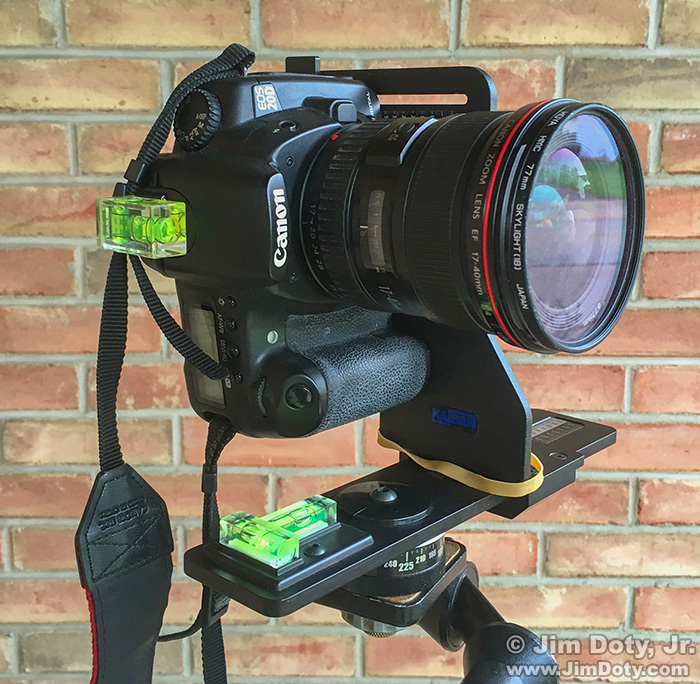
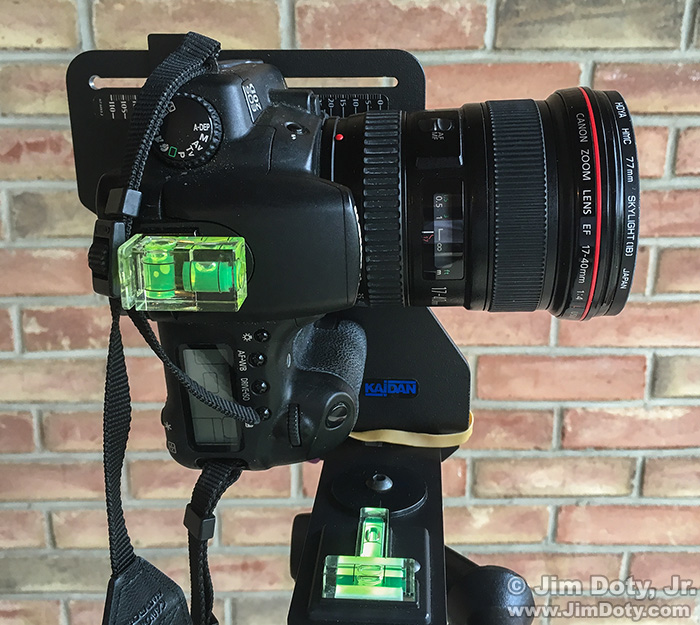
Camera and lens mounted on a Kaidan KiWi-L panorama rig.
If you are looking for an excellent, inexpensive panorama adapter, the Kaidan Kiwi-L is an excellent choice. It has been discontinued which means you can find it for around $30 – $40 on eBay and other sites that sell used camera gear.
Posted May 3, 2018. Revised and expanded May 6, 2018.
In a nutshell, the purpose of a panorama adapter/head is to allow you to take a series of overlapping photos that can be stitched together later in a computer to make one, seamless panoramic image. The panorama head rotates with the camera off center from the rotation point so the nodal point of the lens is over the rotation point.
The KiWi-L used to sell for $160 – $170 new, so buying one used gets you a nice, mid-grade piece of pano equipment for a bargain price. It is plenty sturdy enough to handle the weight of any medium sized DSLR (or something smaller) and most any wide angle to normal zoom lens. It will not handle the weight of a heavy camera like a Canon 1D X with a long, heavy, telephoto lens attached.
The KiWi-L is designed to be used without a quick release system. Just screw it on to your existing tripod head, attach your camera to the vertical mounting plate, align the camera and you are ready to go. In the photo above the KiWi-L is attached to a Bogen 3025 three-way tripod head, but any standard tripod head will work. With the right after-market adapters you can use the KiWi-L with some quick release systems.

Christmas at Easton, Columbus, Ohio. Click for a larger version.
KiWi-L Parts and Basic Adjustments
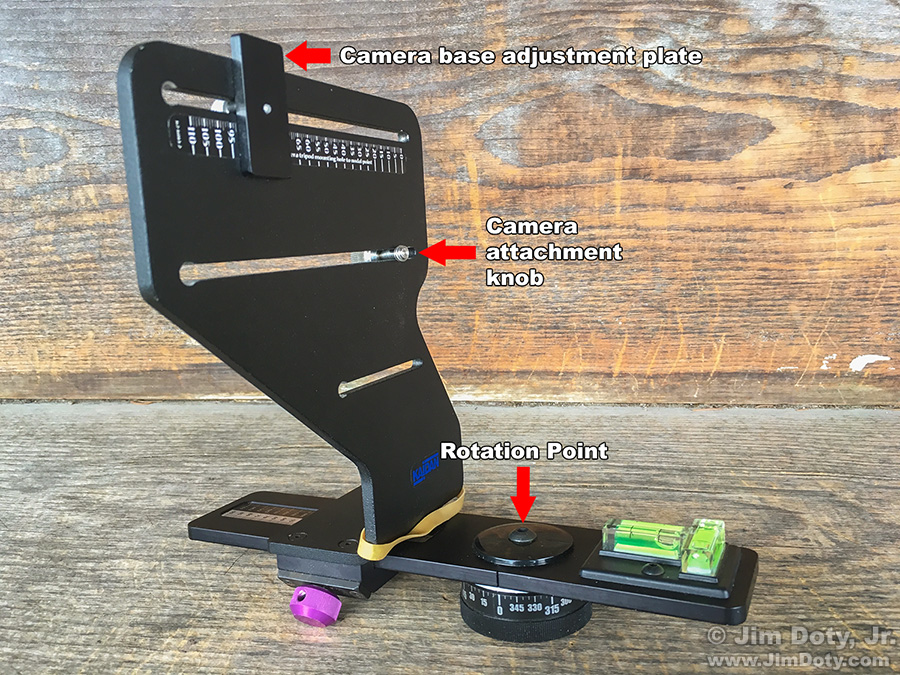
Kaidan Kiwi-L panorama adapter. Click for a larger version.
The KiWi-L comes in two parts, a horizontal bar with a rotation mechanism that mounts to your tripod head and a vertical mounting plate where you attach your camera. The view in this photo is from the back side, which means when the camera is properly attached to the vertical mounting plate, the back of the camera is facing you and the lens is facing away from you.
To put the KiWi-L together, loosen the purple knob and slide the vertical plate on to the horizontal bar and tighten the vertical knob. Then screw the KiWi-L on top of your tripod head.
When your camera is on the KiWi-L, there are three sliding adjustment points to make sure your camera and lens are properly aligned. By loosening the purple knob and sliding the vertical plate to the left or right, you can center the lens over the rotation point. With a good grip on your camera, you can loosen the camera attachment knob and slide the camera forward or backward so the nodal point of the lens is directly above the rotation point of the KiWi-L. The small, camera base adjustment plate slides against the bottom left base of your camera to keep your camera level.
Aligning Your Camera With the KiWi-L
Attach the KiWi-L to your tripod head by screwing the tripod knob on your tripod head into the socket on the bottom of the KiWi-L. Adjust the tripod head until both levels on the KiWi-L are level.

Double bubble level in the camera’s hotshoe.
Put a double bubble level into the hotshoe of your camera. Make sure the double bubble level is fully inserted all the way into the hot shoe. In this photo the level is not fully inserted into the hotshoe and is slightly askew. The double bubble level should be flat for doing panos, which is not the way you would usually use a double bubble level. If you don’t have one you can buy a double bubble level for about $10 at Amazon.
Make sure the tripod head controls are tight and the purple knob on the KiWi-L is tight.
Attach your camera to the vertical attachment plate.
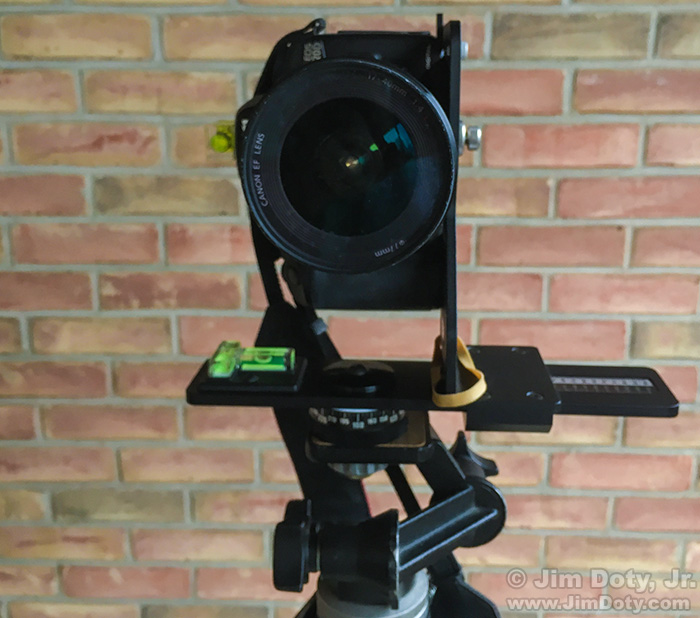
The view from the front with the center of the lens over the rotation point.
Viewed from the front, the center of the lens should be above the rotation point of the KiWi-L. If it isn’t, loosen the purple knob and slide the vertical attachment plate to the left or right until the lens is centered over the rotation point. Tighten the purple knob.
Back third of the lens above the rotation point.
With a good grip on the camera, loosen the camera attachment knob and slide the camera so some place in the middle of the lens is above the rotation point of the KiWi-L. This location is just a wild initial guess at the location of the nodal point which we will refine later. Using the double bubble level in the hotshoe as a guide, level the camera. Then tighten the camera attachment knob.
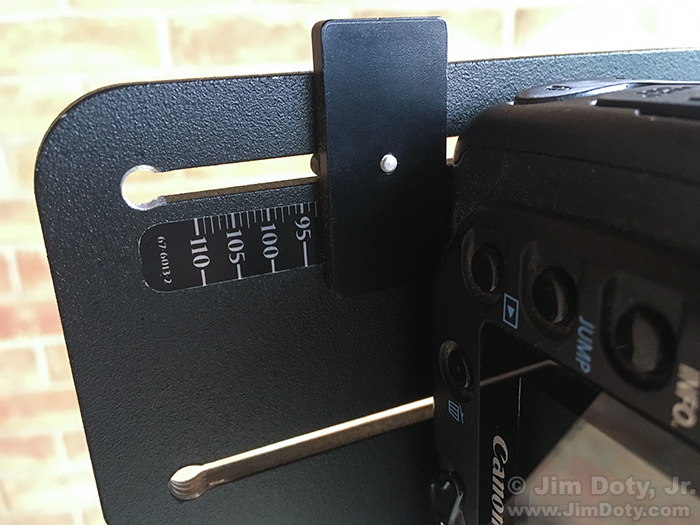
Camera base adjustment plate against the bottom left side of the camera.
Slide the camera base adjustment plate up against the bottom of the camera and tighten it’s knob to keep the camera level. Note the reference scale. For this particular camera and lens focal length the setting is 92. Every setting on the KiWi-L except for the camera attachment knob has a reference scale. Once you have found the nodal point of the lens, you can write down all the scale settings and use them again every time you use the same camera and lens.
Finding the Nodal Point
Finding the nodal point is important. If the nodal point of your lens isn’t over the rotation point of the KiWi-L, your individual photos won’t stitch together properly to make a nice seamless panorama.
There is one exception. If everything in your panorama is 50 or more feet away from the camera, finding the exact nodal point isn’t important. Attach your camera to the KiWi-L and have fun.
Finding the nodal point is a process of trial and error. If you are lucky it won’t take too long. If you aren’t lucky it will take longer. Once you do find the nodal point of the lens, write down the KiWi-L settings so you don’t have to do this all over again.
You will need two vertical subjects, one within 2 or 3 feet of the camera and one farther away. Line up your two vertical subjects. Look through the viewfinder and rotate the camera. Your two vertical subjects will move as you rotate the camera but they should stay aligned with each other. If they move in relationship to each other, you need to move the camera forward or backward on the vertical mounting plate of the KiWi-L until your two vertical subjects stay aligned as you rotate the camera.
The last part of this short (3 1/2 minutes), excellent video (using a different kind of pano rig) will show you exactly what to look for.
Now that you know what to look for, let’s find the nodal point (which is sometimes called the “no parallax point”) using the KiWi-L.
If you are using a zoom lens, zoom your lens to its widest focal length. For example, if it is a 10-22mm lens, set it at 10mm. If it is a 16-35mm lens, set it at 16mm.
Line up your two vertical subjects in the viewfinder of the camera. Then look through the viewfinder and rotate the camera to see if the vertical subjects move in relationship to each other. If they do, you will need to move the camera forward or back on the vertical mounting plate.
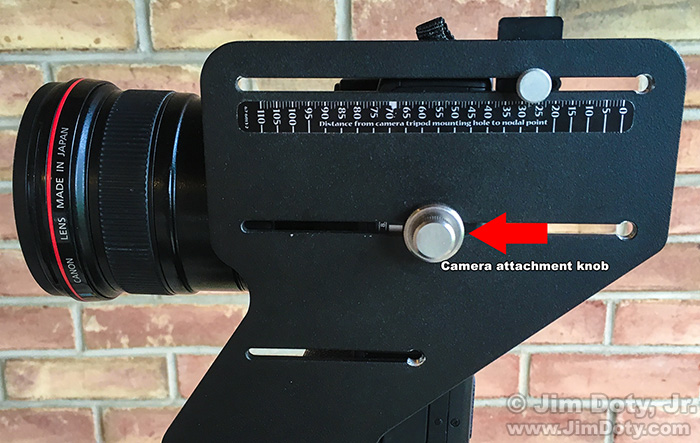
Camera attachment knob on the vertical attachment plate.
Before you do that you might want to mark the location of the camera attachment knob with some gaffer’s tape or painter’s tape. If you go too far in one direction, you have a reference point when you move the camera the other direction. Move the small camera base alignment plate to the back of the vertical attachment plate so it is out of the way.
Grab the camera, loosen the camera attachment knob, move the camera forward or backward about a half inch, and tighten the knob. Look through the viewfinder and rotate the camera. If your vertical subjects move less than they did before, you are moving the camera in the right direction on the vertical attachment plate. If they move more than they did before you are moving the camera in the wrong direction. Keep moving the camera back and forth on the vertical attachment plate until the vertical subjects stay in alignment with each other when you rotate the camera, just like in the video. When the vertical subjects stay aligned you have found the nodal point of the lens. Now slide the camera base adjustment plate back against the base of the camera and check the hotshoe mounted double bubble level again to make sure the camera is level. You are all set.
Make note of the settings on the various scales, and if you want to, mark the final location of the camera attachment knob. Those settings will work every time you use the same camera and lens focal length. I used the same camera and lens every time on the KiWi-L so I never had to move any of the knobs.
Focal Length and Nodal Point
If you are using the same zoom lens to do panoramas but change the focal length, the nodal point will change too. For that reason, and to keep things simple, I always use each lens at its widest focal length. That way I don’t have to move the camera back and forth on the pano rig find the new nodal point. My 17-40mm zoom lens is my preferred panorama lens and I always use it at 17mm. Sometimes I use a 24-105mm lens to do a panorama and I always use this lens at 24mm. If you are using more than one lens to do panoramas, you will need to find the nodal point for each lens and keep track of the settings to use on the KiWi-L for each lens.
Shooting the Panorama
Pick your location and set up. Make sure the two levels on the KiWi-L are level and that the double bubble level on the camera is level.
Manually focus the lens. Use a good hyperfocal distance chart if you want everything to be in focus (see the depth of field series below). Meter the scene and set your aperture and shutter speed in manual mode. You don’t want anything to change from one frame to the next.
Start at the left edge of the scene you want to capture and take picture from left to right until you hit the right edge of the scene you want to capture. Overlap each frame by about 40% with the prior frame.
If you are doing a full 360 degree panorama, start by point the camera 180° away from the point you want in the middle of your panorama. If you have a mountain you want in the middle of your pano, start with the camera pointed in the opposite direction of the mountain. Move from left to right, overlapping frames by about 40%, until you get back to where you started.
Stitching Your Panorama Together
My preferred software brands for stitching photos together into a panorama are Adobe Camera Raw (ACR) (which comes with Adobe Photoshop, Adobe Photoshop Elements, and Adobe Lightroom) and The Panorama Factory. Another good option which is free is Autostitch. Older versions of The Panorama Factory are also free at Cnet.
Panorama Gear for the Arc-Swiss Quick Release System
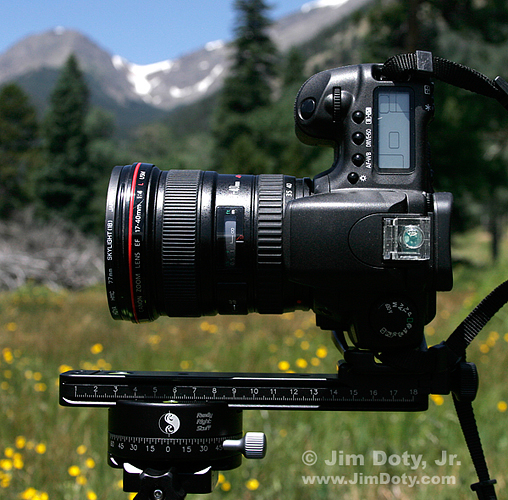
Really Right Stuff pano gear: PCL-1 panning clamp and MPR-CL II nodal slide.
About eight years ago I switched to an Arca-Swiss compatible quick release system using gear from Really Right Stuff and Kirk Enterprise Solutions, so I retired my KiWi-L and switched to panorama gear from Really Right Stuff. I recently shipped off my KiWi-L to one of my children. Before I packed it up I grabbed some photos with my iPhone to write this tutorial.
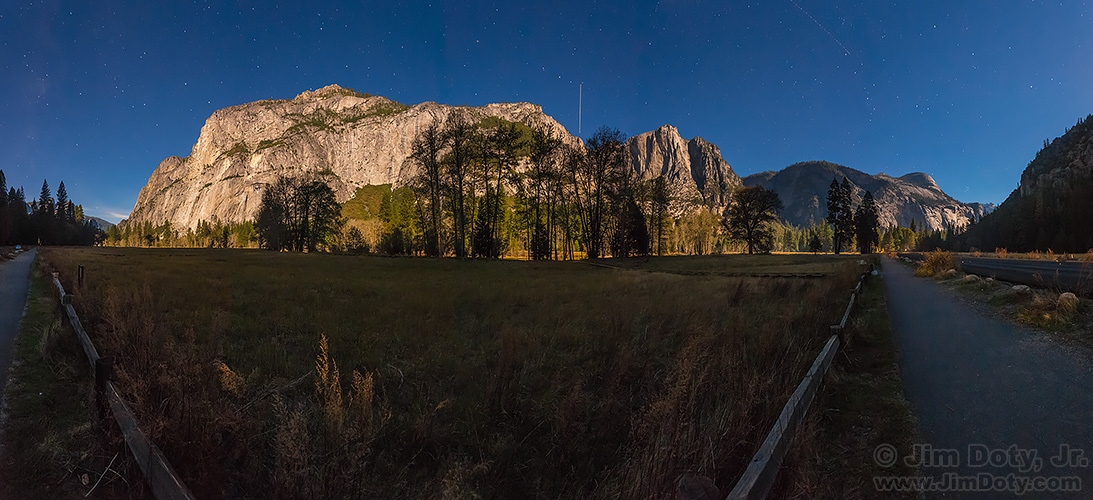
Yosemite Valley at Night. Eagle Peak, Yosemite Point, and North Dome. Yosemite National Park. Five images stitched together with Adobe Camera Raw. Click for a larger version.
Links
Official Manual:
Kaidan KiWi-L Manual  - a downloadable PDF
Software:
The Best Image Editing Software
Articles:
Living in Panorama Heaven: Using Panorama Gear from Really Right Stuff
The Very Best Quick Release System
Keeping Your World Straight: How to Use A Double Bubble Level
Equipment:
The Depth of Field Series:
Depth of Field for 35mm film and full frame digital cameras
Hyperfocal Distance Chart for full frame digital cameras and 35mm film cameras
Depth of Field for digital SLRs with a 1.5x or 1.6x field of view crop
Hyperfocal Distance Chart for Digital Cameras with a 1.5X of 1.6X field of view crop

Kroger 360° Panorama. Graceland Shopping Center, Columbus Ohio. Click for a larger version.