You can create high quality, high resolution digital images of analog prints, and you can do it at home on the road without having a flatbed scanner and computer with you. You probably have everything you need with the possible exception of a couple of small, inexpensive accessories (less than $10 each). This article will show you what to do, step by step.
Why Digitize Prints and Other “Flat” Treasures?
There are several excellent reasons to make digital files from prints, especially if they are one of a kind. One is to have a digital backup of your precious prints which you can keep at a different location. We don’t like to think about it, but floods, tornadoes, fires, and other bad things can happen. Prints are damaged and destroyed all the time. It is good idea to have a digital backup of your prints at a location that is away from your primary photo library. Long before the advent of digital photography my Arkansas grandmother’s home burned to the ground (she was ok) and a lot of precious photos were lost forever.
All of this applies to other flat treasures like special certificates, awards, diplomas, and important old family postcards.
Digitizing prints is also a great way to copy photos that relatives have that you don’t have. And you don’t have to borrow the photos. You can copy them where they live. I just did that on my last trip to visit family in Colorado.
Digital copies are easy to share with other people who would like copies, like family and friends. You can email a few photos. If you have a bunch of photos you can burn them to a DVD or share them via Dropbox.
I recently found an old print from summer camp years ago. I digitized the photo and emailed it to the friends who were in the photo. I also mailed DVDs to a bunch of relatives. Each DVD had a digitized collection of old family photos and postcards from the Wyoming part of the family.
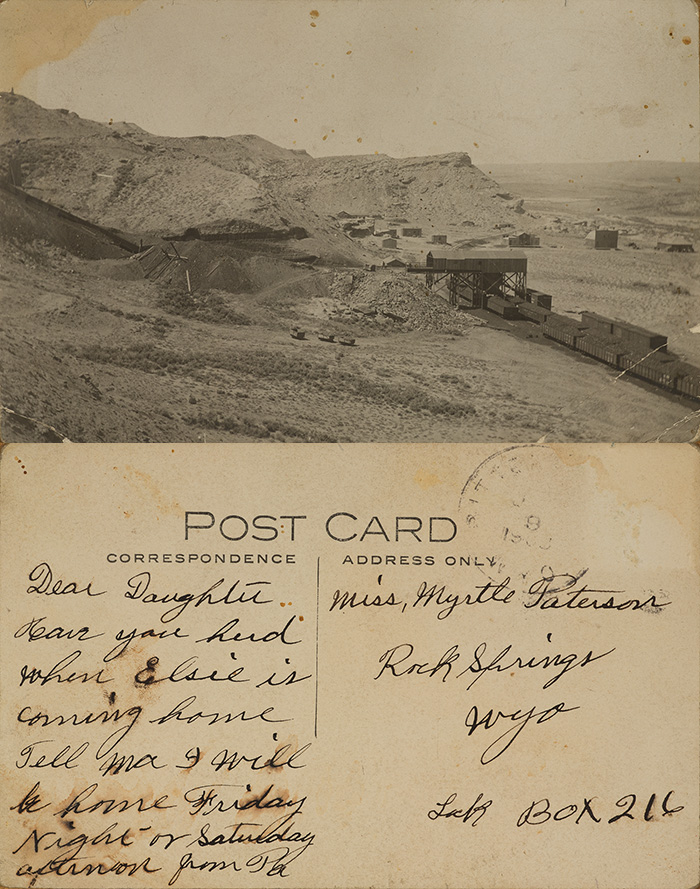
The front and back of a postcard my great-grandfather sent to my grandmother in 1908. The coal mine in the photo is where great-grandpa worked.
We were visiting family in California and there was a treasure trove of old family photos, many of them one of a kind, which had never been digitized. During our visit I spent part of each day digitizing those prints. While I was at it, I used my iPhone to takes some pictures of the process involved to share in this article.
At its simplest you can just point a hand held camera at a print and take a picture (I’ve done that in a pinch), but it will not give you the best quality results. With more time and care, the right equipment, and the right techniques, you can create a digital copy with exceptional image quality that is comparable to a file from a quality flatbed scanner.
So let’s get started.
All descriptions of images in this article are below the image being described.
Equipment List
Camera. Preferably with “live view” mode and the ability to create a “custom white balance”.
Zoom lens. Medium focal length range (24-105 or something similar). The higher the lens quality the better.
Tripod. A sturdy tripod is better than a flimsy one.
18% gray card with a white focusing target in the middle. My preference is one made out of fabric that is collapsible. See the links section below.
Double bubble level. See the links section below.
Location and Light
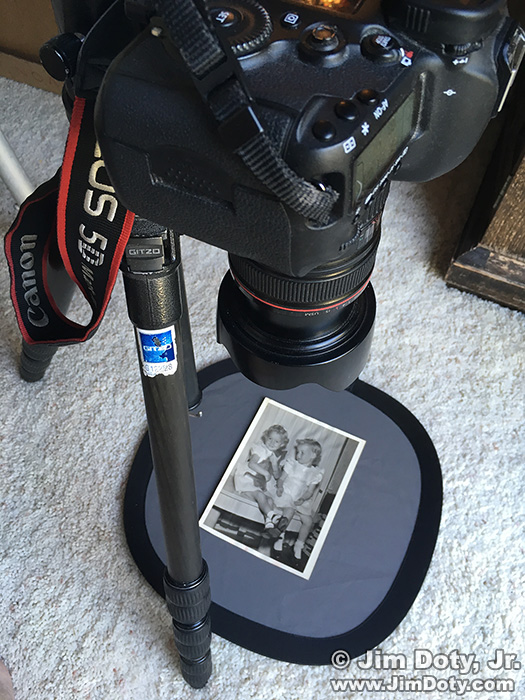
You need a location with a flat, level floor and a soft even light source. I set up next to a large sliding glass door that faced west and did my shooting in the morning when the sun was in the east. This gave me nice even light from the western sky. If there was an even cloud layer creating soft light, I could also work in the afternoon. Do not use direct sunlight. It is too harsh. As you can tell from the faint shadow of the tripod leg, the sliding door/light source is to the lower right.
I prefer using a hard surface floor, since carpet and the pad underneath can “give” a bit as you move around, resulting in a blurred image during the long shutter speeds. I had to be super careful not to move while the shutter was open.
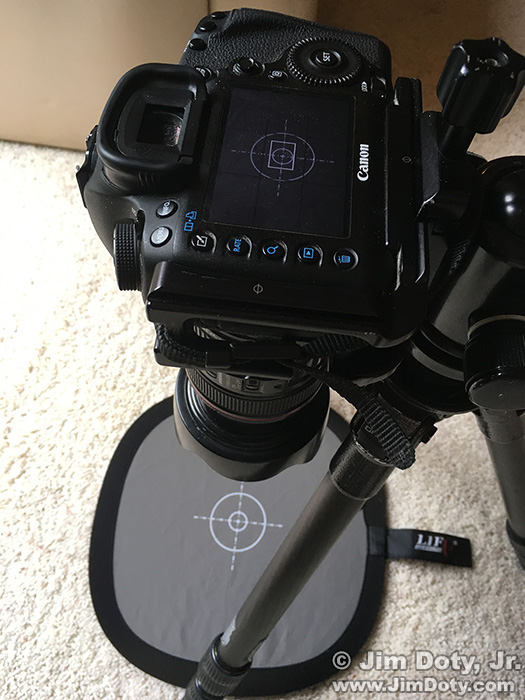
Set up your tripod with two legs on either side of your gray card with the camera pointing straight down and the back of the camera parallel with the floor. The back leg of the tripod will be away from the light source. You do not want any of the tripod legs casting a faint shadow on the gray card and print.
Camera Settings
Put your camera in “live view” mode so you can see your subject on the LCD. Leave your camera in live view mode throughout the rest of this process.
Set your camera’s color space to “Adobe RGB (1998)” this will give you a wider color gamut than “sRGB”.
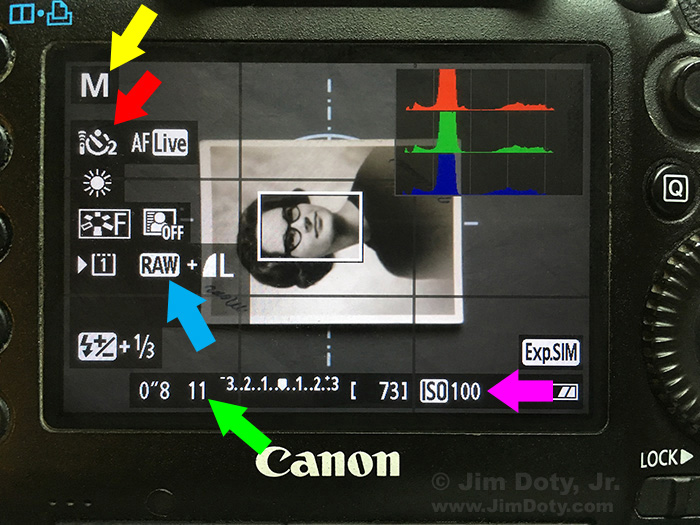
Set your camera to capture RAW files or RAW plus JPEG files at the highest resolution your camera can give you (blue arrow). This will give you the maximum amount of image information.
Turn the self timer to a 2 second delay (red arrow). This will allow your camera to settle down after you push the shutter button, giving you a sharper image. You don’t need to worry about turning on mirror lockup (to avoid vibrations from mirror slap), since the mirror is already locked up when you are in live view mode.
Put your camera in manual metering mode (M, yellow arrow). Set the ISO to 100 (magenta arrow). Set the aperture to f/11 (green arrow). Don’t change the ISO or f-stop for the rest of the photo copying session. f/11 will give you maximum lens sharpness (many lenses are at their sharpest around f/8 and f/11). f/11 also gives you as much depth of field as we can get without getting into the diffraction problems associated with smaller apertures like f/16 and f/22. Not all prints will lay perfectly flat so depth of field is important.
The only setting you should need to change after this is the shutter speed. More about that later.
Turn off autofocus and manually focus the lens throughout your photo copying project.
Level Your Camera
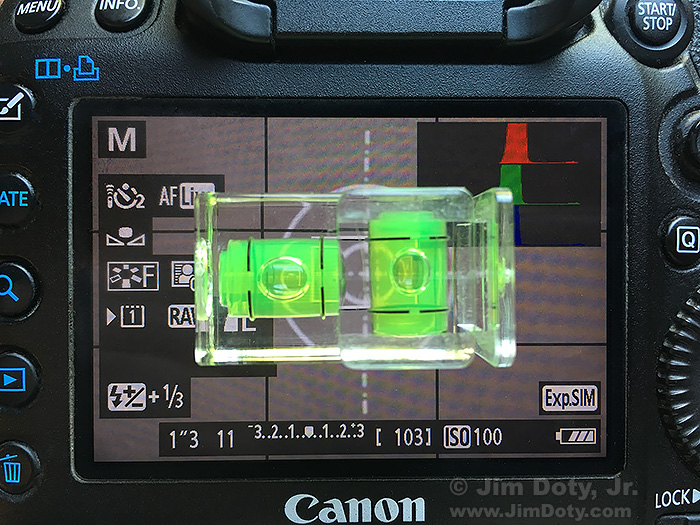
With your camera pointing straight down, level the camera so it is parallel to the floor. You will need a double bubble level to do this. Lay it on the camera’s LCD and adjust the tripod head so both bubbles are centered. From here on in, do not bump the tripod legs or you will need to re-level the camera.
FYI: The level built in to your camera (if it has that feature) will go nuts with the camera pointing straight down. Trying to use the built in camera level will make you crazy.
When the camera is level both left to right and top to bottom (as you look at the viewing screen on your LCD), your camera is parallel to the floor. Once this is done, remove the double bubble level and move the gray card (don’t move the camera) to center the white focusing target on the gray card in the center of your viewing screen.
Set A Custom White Balance
To get the most accurate color your camera is capable of you need to set a custom white balance. Every camera does this a little differently, but it involves taking a picture of an 18% gray card (or something pure white) and using that photo as a standard to create a custom white balance setting. I will show you the process with a Canon camera, but other brands should be somewhat similar. Check your camera’s manual for specific instructions.
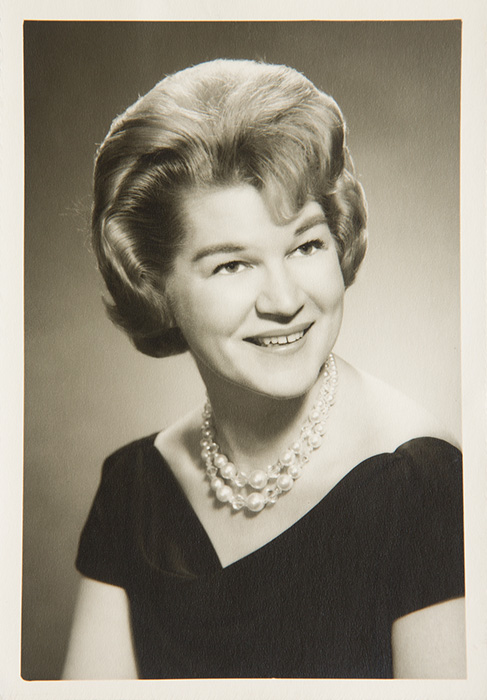
This step is essential when copying color prints, but it is still important when copying black and white images. It will save you time later when you are processing your RAW files in Adobe Camera Raw (ACR). Some black and white images are sepia in tone, like the photo at the top of this article, so you want to keep that tone accurate. You can remove the sepia tone if you want when you use ACR.
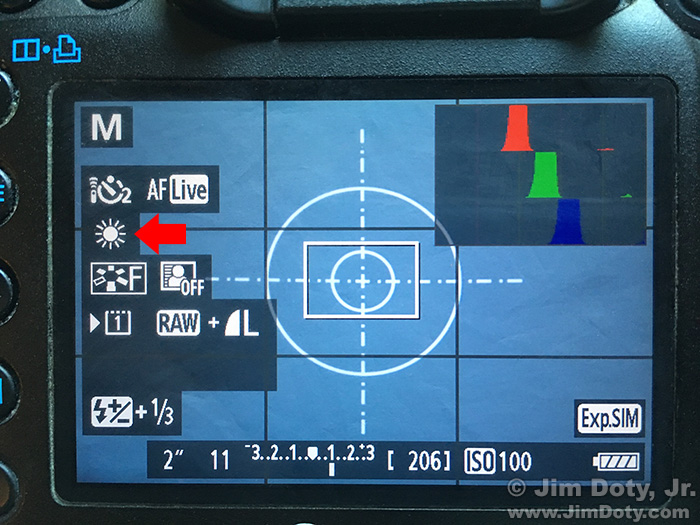
Set the white balance to daylight.
First, meter the gray card. Change the shutter speed until the exposure compensation scale reads zero. Take a picture of the gray card.
On the day I set this custom white balance, the light coming through the sliding glass doors came from a beautiful, clear blue sky. It turned my gray card blue. In photographic terms this bluish light is called a “cool” color balance with a color temperature around 10,000° Kelvin. The white balance on the camera was set to daylight (the sun symbol, red arrow). Note the blue pixels in the histogram (upper right corner) that are shifted to the right, and the red pixels shifted to the left.
Setting a custom white balance will shift this bluish tone back to a true neutral gray.
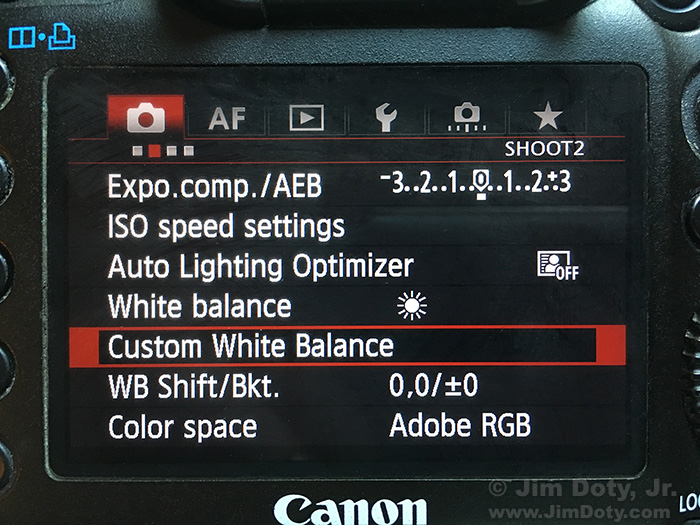 The first step to setting a custom white balance with a Canon camera is to go to the camera menu, choose Custom White Balance, and press the “SET” button on the back of the camera.
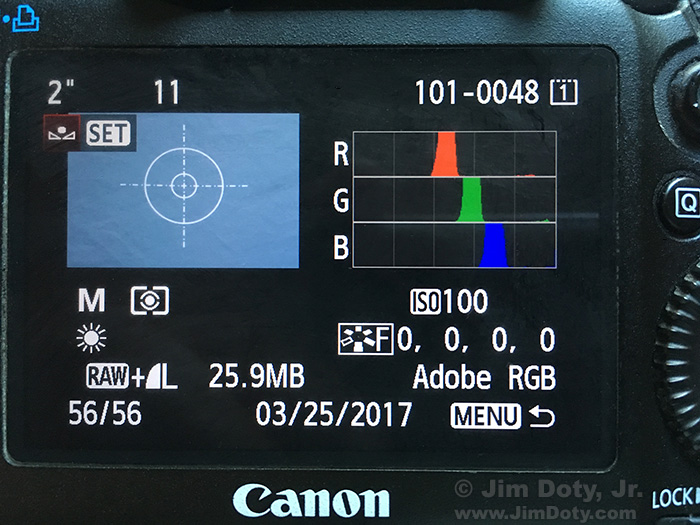 It will show you the photo you just took (in this case, the bluish looking gray card image) with this message: Only “compatible img’s displayed”. That message will disappear in a few seconds.
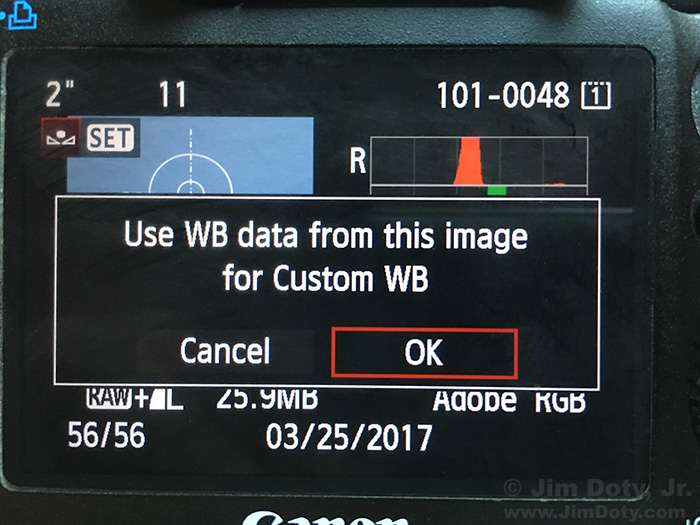 Press the SET button again and the camera will ask you this question: “Use WB data from this image for Custom WB”? The camera wants to be sure you have the image you want to use. Spin the rear control dial to choose “OK” and push SET again.
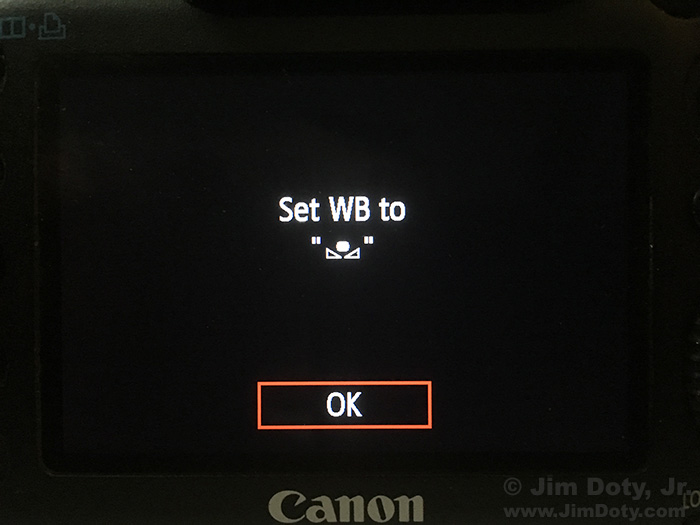
The camera has now stored your newly created custom white balance data into its memory, but it won’t use this information until you tell it to use it. So the camera will send you this reminder message to set your camera’s white balance to “custom white balance”. Press SET on the back of the camera to answer the reminder.
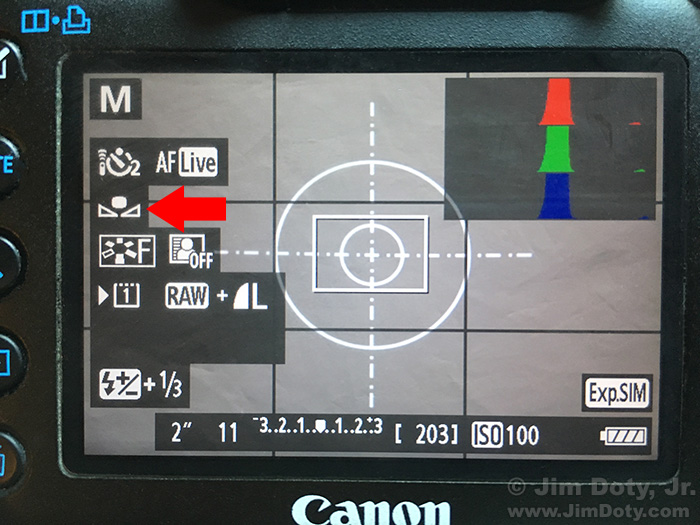
Then change your camera’s white balance from Daylight to Custom White Balance. The Canon custom white balance symbol looks like a white semi-rounded shape over two tiny triangles. The Sony icon is similar and the Olympus icon has a rectangle over the two triangles. Some cameras use the letters CWB instead of an icon.
Meter the gray card once again. This is important. A change in the white balance setting can change the exposure. Make sure the exposure compensation scale is again at zero and take another picture of the gray card.
You should get an image like this. The camera applied the custom white balance data to make the 18% gray card look “gray”, like it is supposed to look, not blue. Note the custom white balance symbol (red arrow). The red, green, and blue pixels in the histogram are lined up on top of each other, which is how they should look when you photograph a gray card after setting a custom white balance. The pixels are also centered in the histogram, which is where they should be. If the gray card image on your LCD doesn’t look gray and if the RGB pixels aren’t lined up on top of each other, you didn’t get something right along the way. Back up and do it again.
As long as the light doesn’t change, you are now all set to photograph prints. If the light intensity changes, you will need to meter again. If the color of the light source changes (like from blue sky to a cloudy sky) you will need to create a new custom white balance.
If you aren’t used to setting a custom white balance, this might seem complicated at first but it will soon become second nature and easy to do.
There are some cloudy bright days when the color temperature of the light is neutral. Setting the custom white balance doesn’t change the color of the gray card at all. The before and after gray card images are the same exact neutral gray color. On days like this you can leave the white balance setting on Daylight while you copy your prints.
You will use your gray card in the following steps so leave it in place under the camera.
The Custom White Balance Is Saved in Your Camera’s Memory
If you stop copying prints and go outside to take pictures, you can change the camera’s white balance setting back to daylight. If you go back inside to copy more prints, just switch the camera back to custom white balance and it will remember the custom white balance data you created earlier. You can return to it any time. The custom white balance you created will stay in the camera’s memory until you create a new custom white balance. Some cameras allow you to save more than one custom white balance in the memory.
Align the Print you want to Digitize
This is simple. The target on the gray card should still be centered in the viewing screen on the back of the camera. If not, re-center it.
Center the print over the focusing target in the middle of the 18% gray card. That means it should also be centered in the viewing screen on the back of your camera. Zoom in so the print comes close to filling the frame. Vertical prints should be horizontal to the camera to better fill the frame.
If your zoom lens creeps when the camera is pointed down, changing the focal length, you can use a heavy duty rubber band around the lens barrel to stop that. Just position it where the inner lens barrel slides behind the outer lens barrel. Or you can use gaffer’s tape (or painter’s tape) to tape the inner barrel from sliding down. Do NOT use duct tape.
Focus on the Magnified Image in Live View Mode
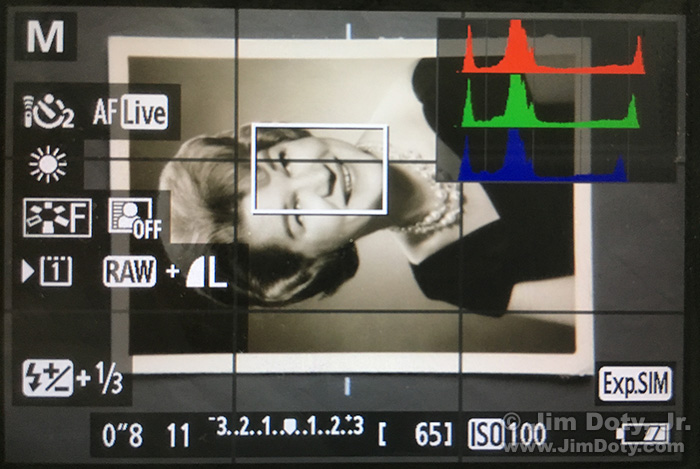
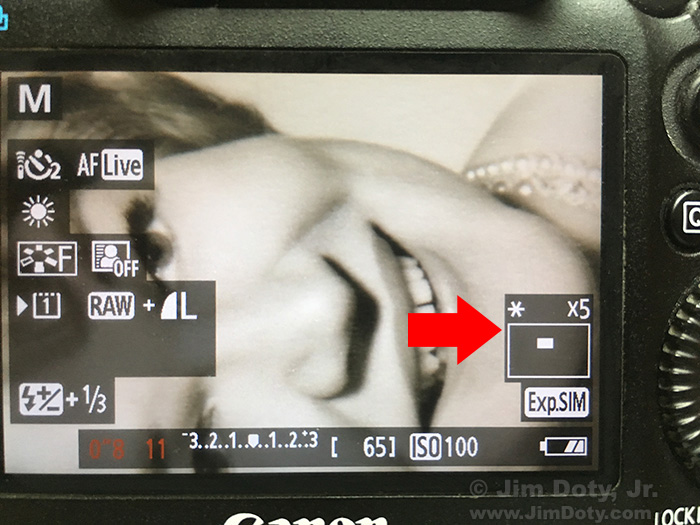
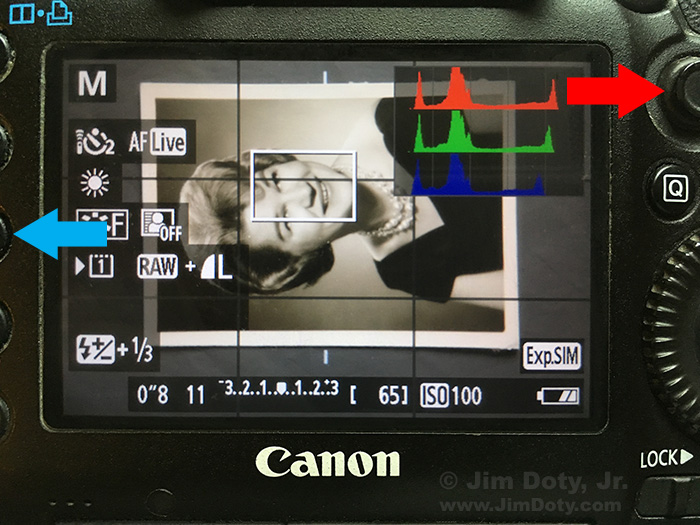 You should still be in live view mode. You will need to pick an area of the photo with some detail to focus on. On a Canon camera use the “joystick” to the upper right of the LCD (red arrow) to move the white rectangle around the image to the area you want to magnify. I picked the face. Now push the magnify button (which is barely visible to the left of the LCD, blue arrow).
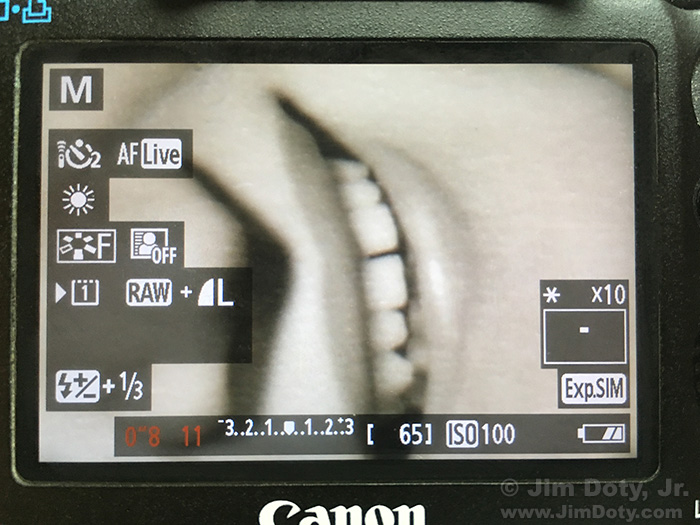
The magnify button will toggle through full image, 5X magnification, 10X magnification, and back to full image again. This image is at 5X magnification. There is a magnification box (red arrow) that shows the magnification. Inside the magnification box there is a white bordered rectangle that represents the whole image and a smaller white box that represents the part of the image you are looking at. You can still use the joystick to move around in the image to anywhere you want to go. I used the joystick to center the teeth in the middle of the magnified area and pushed the magnifying button again.
Now we are at 10X magnification. I manually focused the lens to make the teeth as sharp as possible.
Metering
When you metered the gray card after setting the custom white balance, that meter reading and the shutter speed you used becomes your base exposure for all of the prints you will copy. That setting will work for most prints of the same approximate size unless some prints are too light or too dark to begin with. So it is a good idea to check the histogram after you take the picture of each print and adjust the shutter speed as necessary.
Now we are all set. Just click the shutter and check the histogram.
Check the Histogram
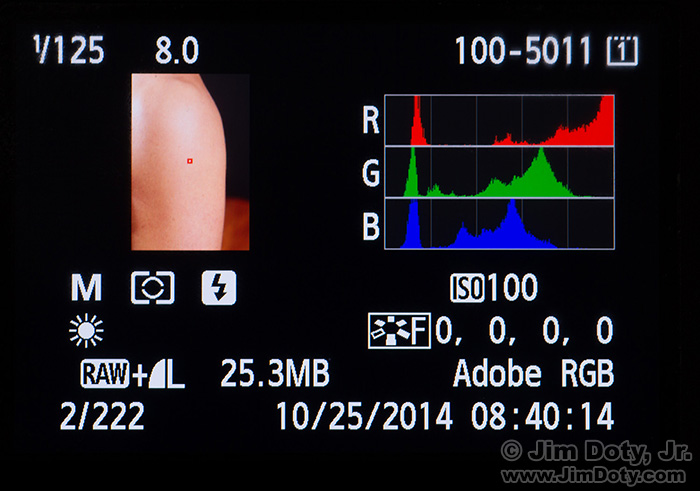
Generally speaking (with some exceptions) you want to make sure there aren’t any burned out pixels in your image which would be indicated by a spike on the right side of the histogram. This image/histogram from another article shows the evidence of the blown out (burned out) red pixels which you can see as red pixels bunched up at the right edge of the histogram.
The other obvious danger is having all of the pixels shifted way over to the left which will mean an overly dark image.
The pixels in a histogram for an image with dark tones should be shifted a bit to the left but not too far to the left. The pixels in a histogram for an image with light tones should be shifted to the right but not too far to the right. How far is too far to the left or right? That comes from experience, but even if you are just getting starting judging histograms you should recognize a histogram that is way off.
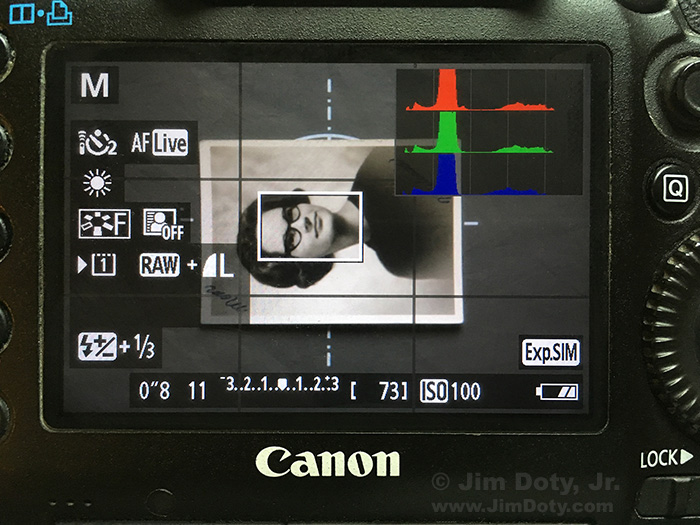
Take a look at this image again. This is a good histogram for this image. We have light skin tones, a medium background, and a dark outfit. The histogram matches these tones well.
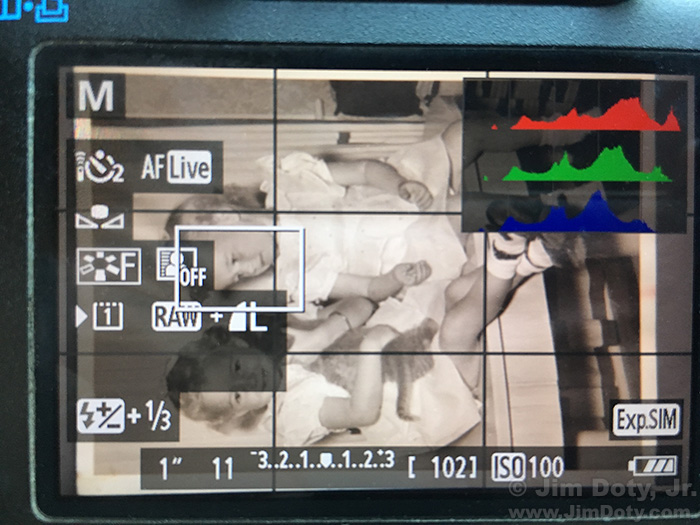
This histogram is well matched to this image. We have light skin tones, white dresses, and a light background so the pixels in this histogram are shifted more to the right. Compare this histogram to the histogram for the image of Melissa. These pixels are where they need to be for a light toned image. We do not have any pixels bunched up against the far right edge of the histogram, which is almost always a no no.
If the pixels in your histogram are shifted too far to the right or left to match the tones in your image, try different shutter speeds until your histogram looks right.
When the Photo is Soft
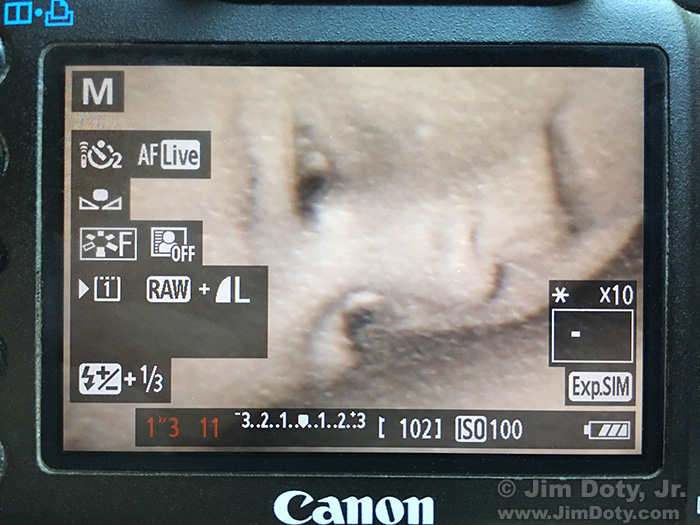
Some old photos, even old photos from a photography studio, are going to look a little soft if not downright blurry. This is part of the “twin sisters” photo at 10X magnification. This photo is soft. The eyes are not crisp. The procedure for copying this photo are still the same. Focus as best you can. It will take a little more time to focus back and forth until you find the best focus you can. Then click the shutter.
Do not boost the in-camera sharpening (to get better JPEG files). You will regret it later.
Some soft photos can be saved when you process the RAW files in Adobe Camera Raw, and some can’t. Try the “Clarity” slider in Adobe Camera Raw and see what you think. A high quality, high resolution copy of a soft photo is still a soft photo.
Photograph the Back
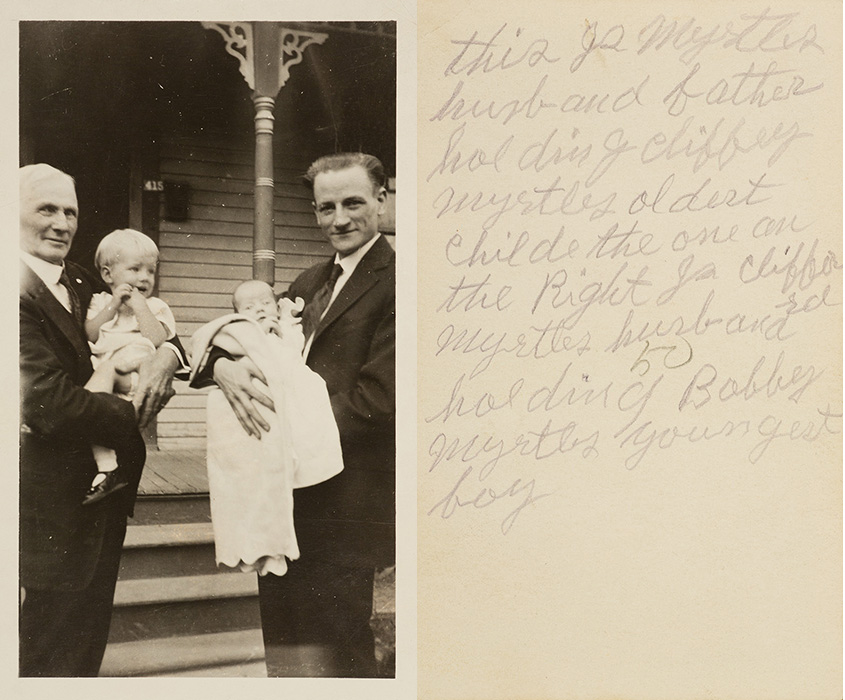
A precious photograph from the 1920s. My grandfather and great-grandfather are holding two of my uncles. On the right is the inscription on the back.
If there is writing on the back of a print, photograph the back too. For the sake of consistency I always photograph the back right after I photograph the front.
Doing This At Home
If you are doing this at home and you have a copy stand and dedicated copy stand lights, that will make makes things more convenient and a ;little faster than using a tripod and natural light, but not necessarily better in quality. If you don’t have a copy stand and dedicated lights, you can get excellent results with careful techniques and the equipment described above.
Even on the road, using a tripod gives me such good results that I no longer needed a flatbed scanner. When my last flatbed scanner died I did not replace it.
An OK Copy You Have is Better Than a Great Copy You Don’t Have
You are visiting your uncle and he shows you an old family photo. It is the only photo you have ever seen of your grandmother as a child. If all you have with you is your iPhone, put the print in soft light and make a copy with your phone. It is better than nothing. Bad things happen to good photographs. You may not get a chance to make a better copy later. If you come back later with better gear to make a first rate digital copy, so much the better. But never pass up a chance to make some kind of copy of a precious photo.
Go Do This!
Somewhere out there some prints are calling your name, asking to be digitized, archived, and shared.
Title and/or Keyword Your Digital Files
After you down download the photos from your camera to your computer, you can use Adobe Bridge (which is a free download) or Adobe Lightroom to title and/or keyword your digital files so other people will know who or what is in the photo. You might recognize the photo of your grandmother as a child but your grandchildren might not. That special photo of the place you proposed will just be one more photo of “the columns” on campus if you don’t put that information in the metadata of the photo. Most well designed image editing software will allow someone to see the metadata you put in your image files.
Post Processing
Shooting is only half the photographic process. The rest happens in the digital darkroom. The biggest favor you can do for the quality of your images is to shoot RAW files and process them with ACR. I cover this topic in several articles. ACR might be all you need to use get the final image you want.
If you want to do more, Adobe Photoshop Elements or Adobe Photoshop are first rate programs to do just about anything you might want to do to your images.
Posted March 3, 2018. Revised and re-posted March 23, 2020.
LINKS
Related Articles
How to Use Your Camera’s Exposure Compensation ScaleÂ
Using the Histogram to Check Studio Flash Exposures
How To Get Critical Focus in “Live View†Mode with a Magnified Image
ACR and RAW: Two of the Best Things You Can Do For Your Images – Be sure to check out the links at the end of the article.
The Best Image Editing Software
Purchase Links
Double Bubble Level at Amazon.com
18% Gray Card with Target, (collapsible fabric) at Amazon.com

