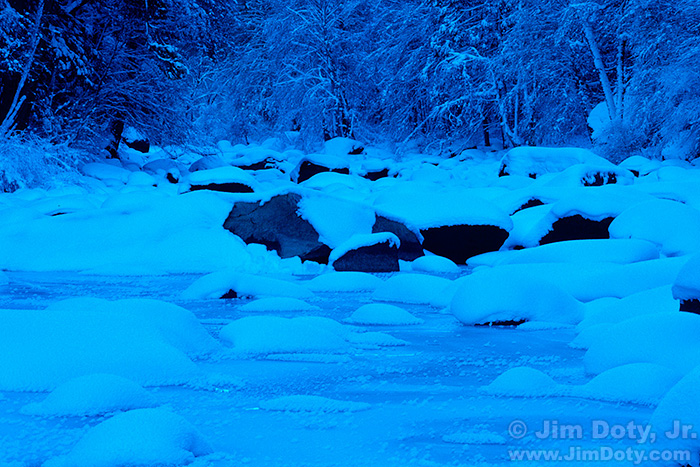
Just like metering daytime winter scenes, the key to metering evening winter scenes is knowing what to meter and deciding how much exposure compensation to use.
This is the fifth in a series of articles on winter photography. To see the rest of the articles go to the series link below. The articles in this series are updated every year during the month of January.
It will be especially helpful if you read Metering Daytime Winter Scenes if you haven’t already. The principles covered in that article apply to this one, so I have not repeated them here.
In order to meter known tonal values, meter only the snow so the camera meter isn’t fooled by darker tones in the scenes. Then apply some exposure compensation. The key is to add less light in the evening than when metering snow in the daytime. For daytime scenes you want the snow to be light and bright so you would typically add about 2 stops of “plus” exposure compensation (+2) to the meter reading your camera came up with. But that is too much for an evening scene.
Turn on the blinkies in your camera. If they are flashing at you, you have seriously overexposed the scene and you will get very little blue.
Much of the charm of an evening winter scene is the cool (bluish) color temperature of the light. The blue tint on the snow is the magic in an evening winter scene. Adding 2 stops of light (which is what you would do in the middle of the day) will wash out much of that blue tone.
So how much “plus” exposure compensation should you add? As a general rule the later in the evening it gets, the less exposure compensation you should add. The final look is a matter of personal taste. I would suggest +1 stop at the most in the early evening, and +1/2 stop later in the evening. For really rich, blue snow, just meter the snow and don’t add any exposure compensation at all. In the photo above of snow hummocks in the Merced River I added about +1/2 stop of exposure compensation to the snow hummocks.
Don’t trust the LCD image on the back of your camera to judge the tonality of your snow. To insure you get the look you want, it is a good idea to bracket your exposures. Your first shot should be your best judgment as to the right exposure then take addition exposures in 1/3 or 1/2 stop increments around your first exposure.
It is very important that you set the white balance on your camera to the daylight setting (indicated on many cameras by a little sun icon). A daylight white balance will render the cool, blue light as it really is – blue. If you set the camera to automatic white balance, it will try to make the snow “neutral” in tone by shifting the snow from blue to white.
Yosemite National Park is a magical place right after a heavy snow. If you have a chance to be in Yosemite after a winter snowfall, by all means go. You will end up with some of your favorite photographs.
Originally posted January 8, 2013. Revised and re-posted January 11, 2021.
Winter Photography Series Links
“How To†Series: Winter Photography – An Overview with links to all the articles
Related Article Links
The Best National Parks to Photograph in Winter
One Photographer and Nine Outdoor/Travel Writers Pick the Best Winter National Parks
“How To†Series: Snowy Owl Photography
More Article Links
Why Is Exposure So Important? The first in a series of articles covering the basics of exposure with links to the rest of the articles.
Speaking Your Camera’s Language: Aperture, Shutter Speed, and ISO (thinking in stops).
Using Reflected Light Meters, Part One (with a section on exposure compensation).
How To Use Your Camera’s Exposure Compensation Scale
Exposure Warning: Turn on the Blinkies
The Best Colors Come From the Best Exposures
Book Article Links
Nature Photography Books: The Three Essentials. If you only read three nature photography books, put these on your “must read†list.
My Two Favorite Introductions to Landscape Photography. If you only get two books on landscape photography, these are the books to get.
The Best “How To†Nature Photography Books
Mastering exposure is one of the first and most important steps to becoming a better photographer. One of the best ways to do this is to read Digital Photography Exposure for Dummies and do the exposure exercises in the book. This book will teach you the basics and then take you well beyond the basics. Digital Photography Exposure for Dummies is one of the highest rated photography books at Amazon.com (5 stars) and it praised by amateurs, professional photographers, and photography magazines as one of the most helpful and comprehensive books on exposure currently available. You can learn more here and order it at Amazon.com.
Location Link
Yosemite National Park – the official NPS site.


