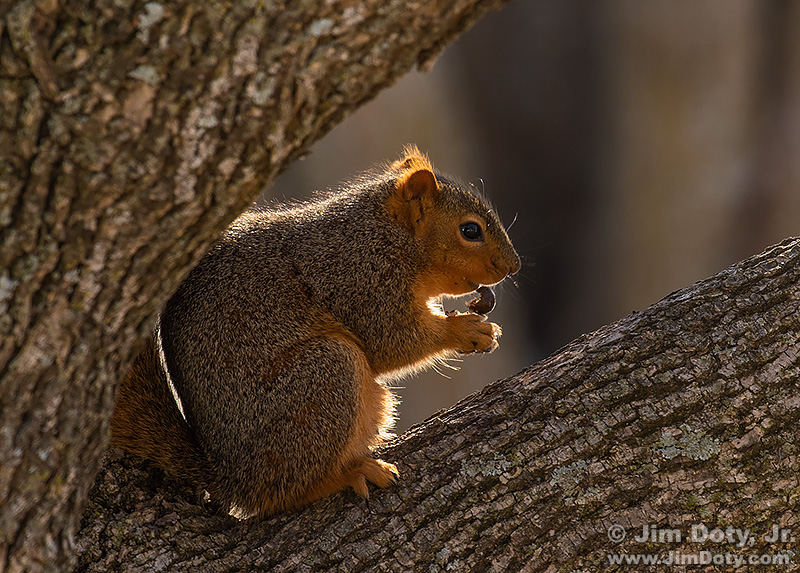
You don’t often come across really nice “rim light”, so when it happens, make the most of it. I happened to glance out the window and saw this squirrel surrounded by rim light and grabbed a camera.
Rim light happens when your subject is back lit and there are fine features for the sunlight to wrap around and highlight.
Rim light shows up best against a dark background. I moved up and down my front porch to get the darkest background behind the squirrel that I could find. In some places there was bright sky behind the squirrel and the rim light was totally lost. I picked the darkest trees across the street that I could find for the background.
Backlight can be very dramatic but it is also the most challenging to meter. One approach is to begin with “basic daylight exposure” (BDE) and add two stops of light. Another is to spot meter your subject and use the right amount of exposure compensation to give your subject the right tonality.
When a subject is backlit it will generally look more natural if it is a little darker than when it is front lit. This is an artistic decision.
As long as your subject doesn’t run away, it is also a good idea to bracket exposures widely to insure the best possible exposure. Backlight can be tricky and bracketing provides you some extra exposure insurance. You will have more choices when you check out the photos on your computer.
In the case of this squirrel, I started by metering the squirrel and began with about – 2/3 stop of exposure compensation and then bracketed around that by trying different shutter speeds. Fortunately for me the squirrel was busy eating so I had plenty of time to make sure I nailed the exposure.
Check your histogram. You might see a small spike on the right for the rim light. You want a nice mountain of pixels somewhere near the middle of the histogram for you primary subject. Check out the histogram article linked below.
The squirrel is nicely posed but it is the rim light that really makes the photo.
Photo Data: Canon 7D Mark II, Canon EF 100-400mm Mark II lens at 400mm. f/11, 1/160 sec, ISO 400.
Links
How to Use Your Camera’s Exposure Compensation Scale
Why Exposure is So Important with links to the Exposure Series
