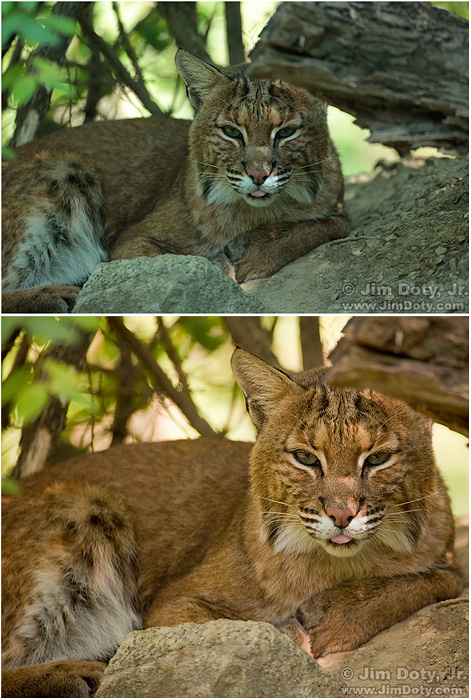
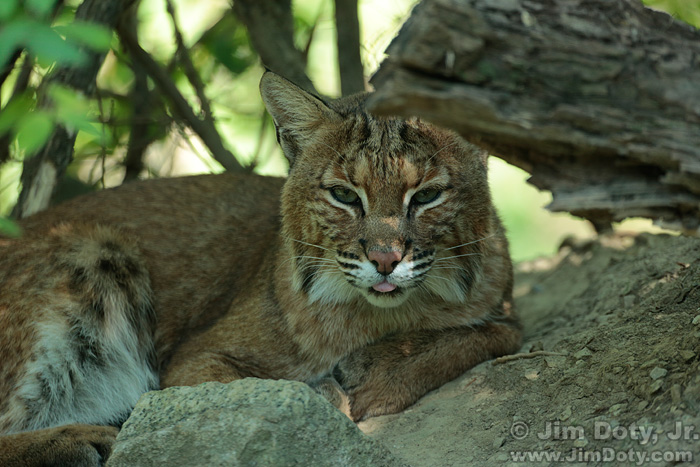
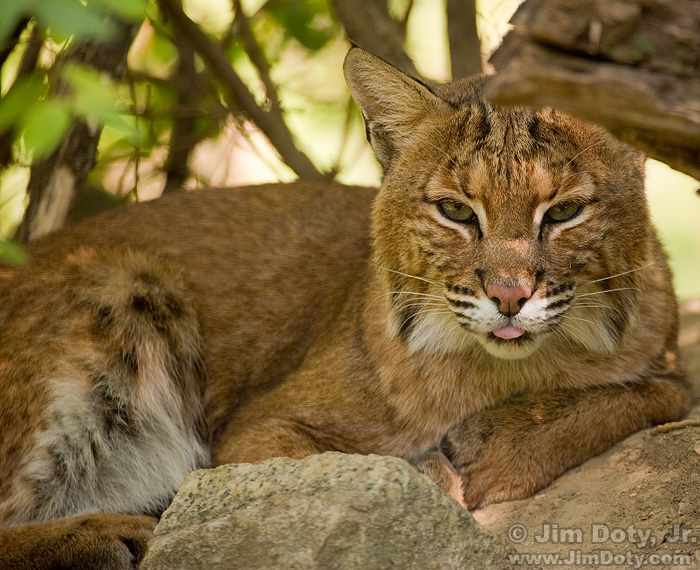
With the right software, you can do amazing things. There are some lighting situations where it is almost impossible, and certainly not practical, to get the correct white balance setting in the camera. This bobcat photo is an example. The best, fastest, and simplest solution is to get the right while balance setting after the fact using software like Adobe Camera Raw (ACR). A few minutes work with ACR can make a huge difference in the look of your photo.
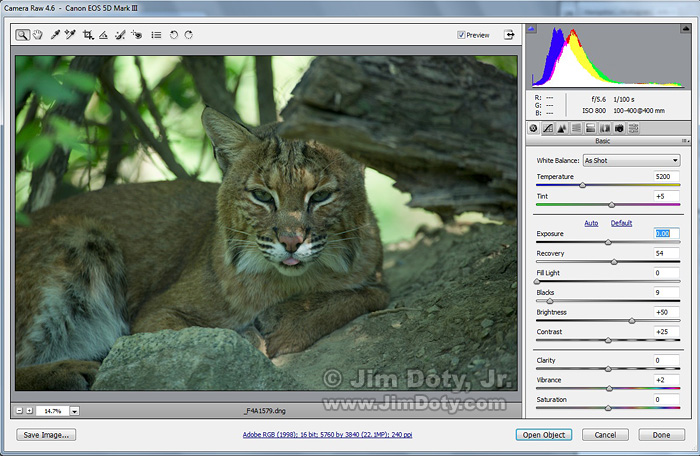
The problem in this situation is the location of the bobcat. Sunlight coming through the thick canopy of green leaves turns the color balance of the light green. This is mixed with some shady light which is blue in tone. The color balance and temperature shift is most obvious in the white fur which is bluish-green instead of white, but it ruins the overall appeal of the whole image.
None of the standard, pre-set white balance settings on the typical digital camera can compensate for the greenish/blue tonality. Setting a custom white balance on the camera isn’t practical either since you can’t walk up to most wildlife with a gray or white card, photograph the gray/white card in the same light as the bobcat, and use that photo as the basis for setting a custom white balance on the camera.
The solution is to shoot RAW files in the camera and adjust the tonality of the image using software like Adobe Camera Raw (ACR). There are a lot of advantages to shooting in RAW with your camera (or RAW plus jpeg), and the ease with which you can adjust the tonality of your subjects is just one of them.
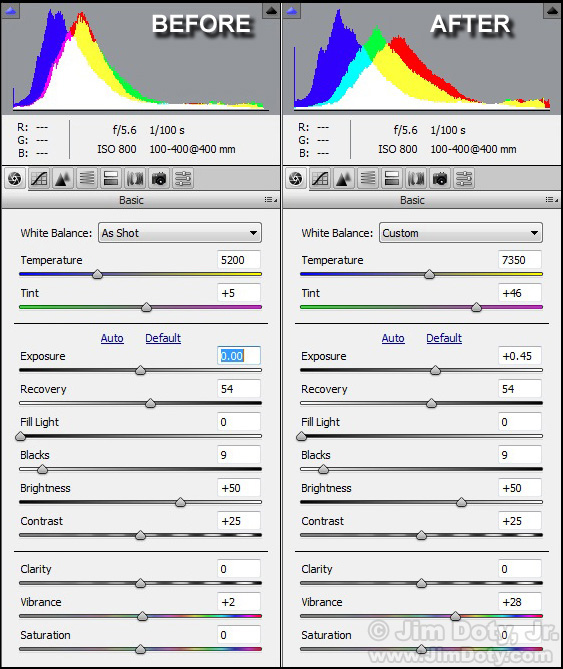
This is the original RAW file after it has been opened in ACR. The “White Balance” setting in the window at the right is “As Shot” in the camera. Note the Temperature, Tint, and Exposure sliders which have not yet been changed.
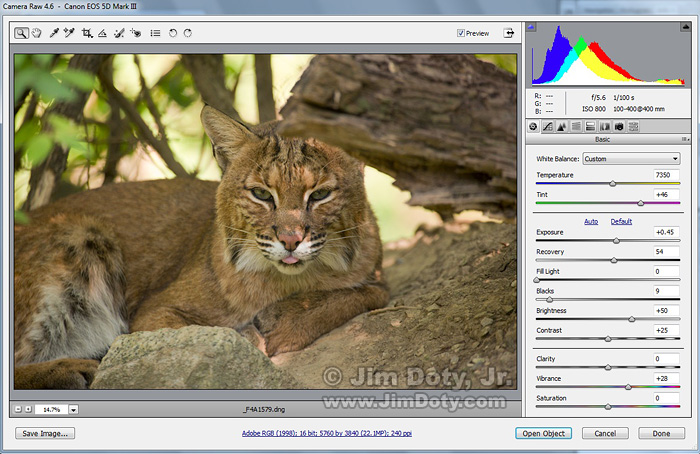
I deliberately underexposed this image so I wouldn’t burn out the sunlit background. It was my intention to fix the exposure later in ACR. I moved the “Exposure” slider a little to the right to lighten the exposure on the bobcat. I moved the “Recovery” slider quite a ways to the right to keep the sunlit highlights from burning out. The Recovery slider is used to “recover” pixels that are too light in the image. In a RAW file you can recover more pixels than you can with a jpeg file.
The next step was to drag the “Temperature” slider to the right to compensate for the blue cast in the image. The Temperature slider is the blue/yellow slider. Moving this slider to the right warms up the white balance by adding yellow to the image. Moving it to the left cools down the white balance by adding blue to the image.
Next I moved the “Tint” slider to the right to compensate for the excessive amount of green in the image. The Tint slider is the magenta/green slider. Move it to the right for more magenta (to compensate for a green shift), and to the left for more green (to compensate for a magenta shift).
For those of you who are curious about the “LAB color” (which is a powerful color space for changing the tonality of an image), the Temperature and Tint sliders are the same as using LAB color to shift the blue-yellow tones and the green/magenta tones in an image.
Last of all, I increased the “Vibrance” in the image by moving the slider to the right. This increase the color saturation of non saturated colors, but leaves the saturated colors alone.
The total time it took to adjust the exposure and color tonalities of this image was about 3 minutes.
Here’s a closeup of the before and after the adjustments with so you can see what I did. Note the shift in the RGB histogram at the top from the left to more toward the middle, a better histogram for this image. The Recovery slider on the left panel was already adjusted when I grabbed the screen shot. It was initially at zero.
When using ACR, you aren’t changing the original RAW file, so feel free to experiment. You can’t hurt anything. Drag the sliders and see what they do. You can always re-open the original RAW file in ACR and start over.
ACR has a lot of other adjustments available but this set of basic sliders will go a long way to improving your images when getting the right white balance in the camera isn’t practical.
ACR is included with all recent version of Photoshop Elements (which is one of the best choices for image editing software in the $100 range), and also with all recent versions of Adobe Photoshop.
After correcting the image in ACR, I did a little final tweaking in Photoshop, and then cropped it for a more pleasing composition that is more in keeping with the “Rule of Thirds”.
In many situations, you can choose a pre-set a white balance setting on your camera, or create a custom white balance with your camera, and save a lot of work later on. But when you can’t, ACR can usually save the day.
Photo Data
This bobcat was photographed through thick plate glass at the Columbus Zoo. Canon 5D Mark III. Canon EF 100-400mm zoom lens at 400 mm. F/5.6, 1/100 second, ISO 800.
Links
To learn more about photography, including exposure techniques, dealing with tricky exposure situations, color temperature, working with the light, white balance settings, custom white balance, and photographing wildlife, read my highly rated book, Digital Photography Exposure for Dummies. Read more about it here and order it at Amazon.com.
You can order Photoshop Elements 10 (and the upgrade), in the software section of my photography store which is powered by Amazon.com’s great prices and customer service.
If you want to learn about using LAB color in Photoshop, go the Photoshop books section of my photography store and look at these excellent books by Dan Margulis, Professional Photoshop: The Classic Guide to Color Correction and Photoshop LAB Color, The Canyon Conundrum and Other Adventures in the Most Powerful Colorspace.

