Most wildlife are medium to dark in tone, making them a challenge to meter properly in the bright, white tones of winter. If you trust one of your camera’s automatic exposure modes, the odds are good you won’t get the best exposure. If you switch over to manual exposure and make the right decisions, you can get great exposures and better quality photos (more about that later).
This is the fourth in a series of over a dozen articles on winter photography. To see the rest of the articles, go to the series link below. The articles in this series are updated every year during the month of January.
It would be especially helpful if you read Metering Daytime Winter Scenes if you haven’t already. The principles in that article apply to this one. You should also read Metering Wildlife in the Snow, Part One before reading this article.
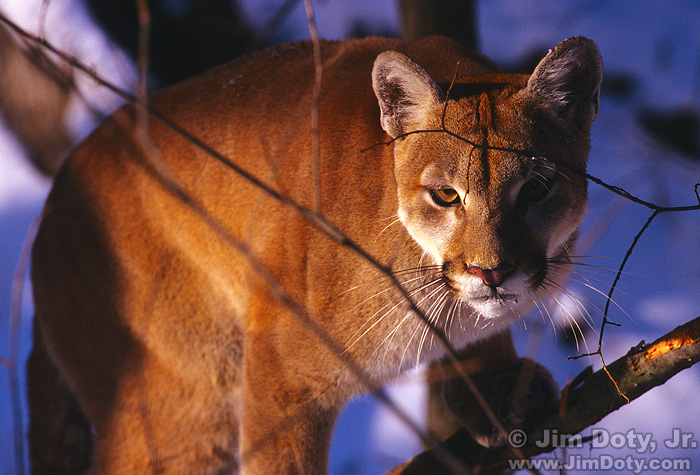
This cougar is an example of one of those rare situations when the animal is so close you can actually meter the side of the animal with no risk of the camera being fooled by the background.
This photo was taken using slide film, which in some ways is the same as metering with a digital camera, but in some ways it is different. With both slide film or a digital camera, you do not want to blow out any of the highlights or they are gone forever, never to be reclaimed. However, slightly underexposing slide film can increase the saturation of the colors. When Kodachrome was king, several National Geographic photographers would regularly underexpose Kodachrome 64 to get more saturated colors. However, underexposing a digital file damages the quality of the colors. To capture the rich colors of the cougar, I zoomed in and metered the side of the cougar, subtracted about 1/2 stop of light from what the camera meter said (-1/2 stop exposure compensation), zoomed back out to recompose and took the picture. When I got my processed slides back the colors were exactly what I wanted. Of course the intense expression on the cougar’s face was exactly what I wanted too.
If I was taking the same photo with a digital camera, I would meter the side of the cougar and use that as the exposure, no exposure compensation necessary. If you are not using exposure compensation on a regular basis it is time you learn how. Read the other articles in this series and the links at the bottom of this page.
Exposure compensation is not only the key to getting the right exposure, it is also the key to getting the best colors your camera is capable of producing. One of the secrets of great color is to get the best possible exposure. If you miss the ideal exposure by more than 1/2 stop, the colors in your photo with shift in different directions. You can’t correct for this after the fact with image editing software. Since the colors shift in different directions, if you correct one color, the other colors in your photo become even worse. There is no getting around it, if you want great colors in your images, you have to master exposure. Getting great exposure is why some photographers consistently get wonderful colors in their images. Photographers who use autoexposure have no idea how much better the colors in their photographs could be.
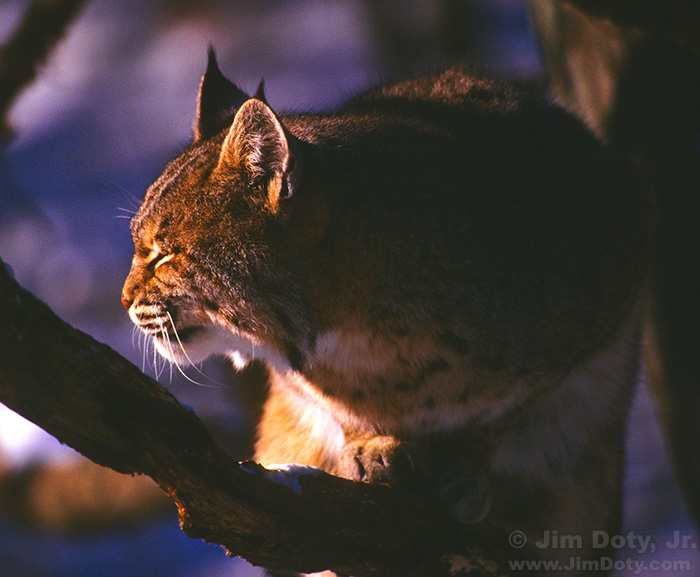
The exposure for this bobcat is tricky, thanks to the high contrast scene. Auto exposure is pretty much guaranteed to blow out the exposure for this bobcat. There are too many dark tones in this photo. With the camera meter’s passion for middle gray tones, it will lighten the dark tones and seriously overexpose the sunlight on the bobcat’s face. Spot metering the bobcat’s face is one way to get the right exposure, but many camera’s don’t have a small enough “spot” to do this accurately. This is when substitute metering comes to the rescue.
The same light of the rising sun (to camera the left) that was side lighting the bobcat was also hitting me. That makes the solution simple. Take out an 18% gray card, turn it so the gray card is directly facing the sun, meter the gray card, and lock in that exposure setting, preferably in manual metering mode. Put away the gray card and take the picture of the bobcat.
When I took the photo of the bobcat I was facing south and the sun was coming up in the east. The angle of the gray card is critical. If you follow the typical advice to have the gray card facing the camera (in this case to the north) rather than the light source (in this case the sun to the east), you will totally miss the right exposure. Have the gray surface of the card facing the sun, which means you will have to turn and face west to meter the gray card. Once you meter the gray card and lock in that exposure, turn back to the south to take the picture of the bobcat. Learn more in How To Use an 18% Gray Card.
The simplest and most accurate way to meter this scene (and also the most expensive) is to use an incident light meter. Just point the white dome of the incident light meter at the rising sun, push the button, check the results (aperture and shutter speed) on the incident light meter and transfer them to your camera. The only catch is you have to own an incident light meter. Used properly, a $10-12 gray card will give you the same results as a $300 incident light meter.
Originally posted January 16, 2015. Revised and re-posted January 27, 2023.
Winter Photography Series Links
“How To” Series: Winter Photography – An Overview with links to all the articles
Metering Daytime Winter Scenes
Metering Wildlife in the Snow, Part One
Related Article Links
The Best National Parks to Photograph in Winter
One Photographer and Nine Outdoor/Travel Writers Pick the Best Winter National Parks
“How To” Series: Snowy Owl Photography
More Article Links
Why Is Exposure So Important? The first in a series of articles covering the basics of exposure with links to the rest of the articles.
Understanding apertures, shutter speeds and ISO settings
Using Reflected Light Meters, Part One – with information on exposure compensation.
How To Use Your Camera’s Exposure Compensation Scale
Simplify Your Life With an Incident Light Meter
The Best Colors Come From the Best Exposures
Exposure Warning: Turn on the Blinkies
The Best Incident Light Meters – a short review article with links.
Links to Articles About Books
Mastering exposure is one of the first and most important steps to becoming a better photographer. One of the best ways to do this is to read Digital Photography Exposure for Dummies and do the exposure exercises in the book. This book will teach you the basics and then take you well beyond the basics. Digital Photography Exposure for Dummies is one of the highest rated photography books at Amazon.com (5 stars) and it praised by amateurs, professional photographers, and photography magazines as one of the most helpful and comprehensive books on exposure currently available. You can learn more here and order it at Amazon.com.
How To Find Wildlife, The Best Books
How To Photograph Wildlife, The Best Books
The Best “How To” Nature Photography Books including the excellent Stackpole series of books on photographing wildlife.
Location Links
The cougar and bobcat were photographed at Wildlife Prairie Park west of Peoria, Illinois. It is a great place to photograph North American wildlife in large, open


