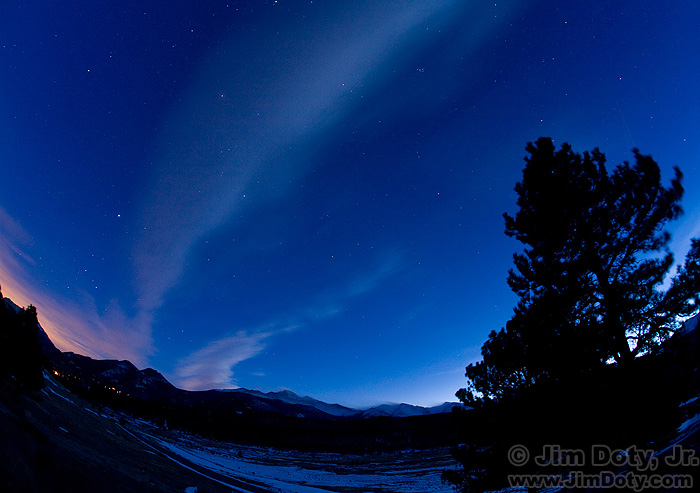
Twilight, Rocky Mountain National Park. Sirius, Canis Major, Orion, Taurus, the Hyades star cluster, and the Pleiades star cluster are all visible in the fading light. Click for a larger version.
You can photograph the night sky year around, but winter brings an added bonus: SNOW! When you don’t have the benefit of moonlight, most of the year land forms a dark to black silhouetted skyline against the night sky. In winter you have the possibility of including the highly reflective snow. You can see both in this photo. Any place not covered with snow is very dark to black. Having reflective snow is why winter is the favorite time of year for a lot of photographers to go out and photograph the night sky.
This is the sixth in a series of articles on winter photography. To see the rest of the articles, go to the series link below. The articles in this series are updated every year during the month of January.
I am assuming most of the people who need this article will be new at this, so the instructions will be pretty detailed.
Equipment
You will need a camera that has manual exposure settings, ISO speeds to 800 or higher, and shutter speeds to 15 or 30 seconds, and B for “bulb” (see the next section).
You will need a wide angle lens or lenses (at least 28 mm, and 20 to 25 mm would be even better) that can be manually focused, with a maximum aperture of f/4 (although f/2.8 or f/2 would be even better). The advantage of wide angle lenses is they take in more of the night sky and landscape, and they have less star trailing at any given shutter speed (more about that later). Single focal length lenses are better because they are faster (wider maximum apertures) and most of them have a fixed and easy to locate infinity setting on the focus ring. Lenses are sharper and have less aberrations when stopped down. A single focal length f/2.8 lens will provide better image quality stopped down to f/4 than a zoom lens wide open at f/4. I use a 24-105 mm zoom lens for almost everything in that focal length range in the daytime, but I have a 24mm f/2.8 lens for night sky photography.
You will also need a sturdy tripod.
A locking cable release isn’t required but can be helpful.
B is for Bulb
Long ago, photographer’s controlled exposure times by squeezing a compressed air bulb. The shutter stayed open for a long as the bulb was squeezed (all shutter speeds were long back then). We no longer squeeze a bulb but the letter B is still with us. Today the B setting means the shutter is open for as long as you hold down the shutter. When you run out of shutter speeds (which is usually 15 or 30 seconds with most modern cameras), just switch to bulb. The problem with bulb is the risk of jiggling the camera while holding down the shutter button. You can help matters by holding your first finger on the shutter button and your thumb under the bottom right side of the camera and squeezing these two fingers toward each other.
The ideal solution to minimizing vibrations is to use a locking cable release. Some come with a built in timer so you don’t need to count seconds or use your watch. Just set the time on the timer.
Set Up
Put your wide angle lens on your camera body and focus the lens manually at infinity. Don’t use autofocus. It gets unreliable as it gets darker. Some lenses, especially zoom lenses, can focus past infinity, so make sure your lens is focused exactly at infinity. For help with this, read this article.
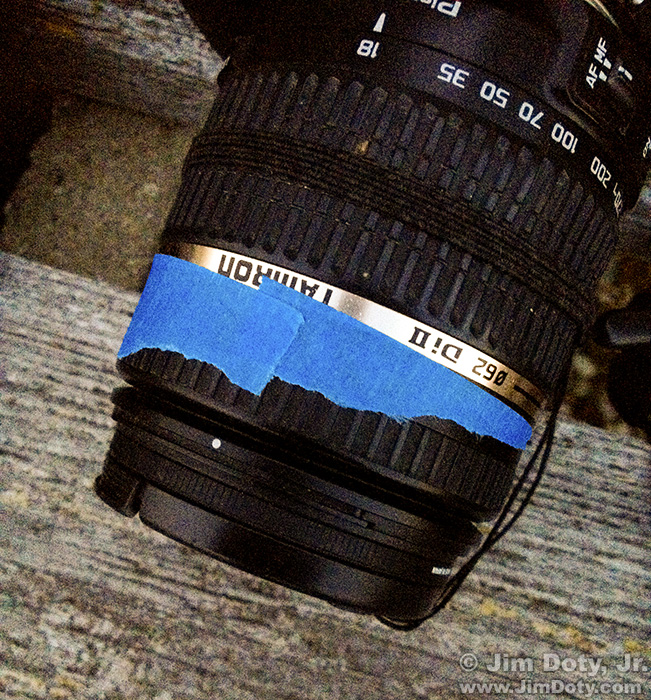
One way to do this with a zoom lens that focuses past infinity (or has no distance scale at all) is to focus the lens on something very far away (like the distant horizon) during the day, and then tape the focusing ring (use gaffer’s tape, not duct tape) so it doesn’t move. Or you can focus on something at infinity during the day and look carefully to see where the distance scale markings line up. The exact location of infinity changes as you zoom the lens, so a good idea is to stick to the widest focal length on your zoom lens and figure out exactly where infinity is at that focal length.
If you takes some pictures and your stars look more like little round blobs than stars, your lens wasn’t focused at infinity.
Set the camera to manual exposure mode and put it on a tripod. A bean bag will work in a pinch but that makes it harder or even impossible to see through the camera’s viewfinder.
Twilight Exposures
After the sun sets, wait for the first stars to appear. Your camera will record more stars than your eyes can see. The key is to meter the deep blue sky for as long as there is enough light for your camera to meter properly. In manual exposure mode meter only the sky so the meter isn’t fooled by trees, mountains, or anything else in the dark foreground. To keep your sky dark you may want to subtract from 1/3 to 2/3 stops of light from what the camera meter tells you (-1/3 to -2/3 stops exposure compensation). Lock in that exposure, recompose to include your foreground and take the picture. As the sky gets darker, keep changing the exposure. Your camera will pick up more and more stars.
The reason for using manual mode is so your exposure settings don’t change when you re-aim the camera to add the foreground. In manual mode your exposure settings are essentially “locked in”, they won’t change until you change them.
The amount of exposure compensation for a dark blue twilight sky is a matter of personal taste. Experiment to see what you like. Do not trust the image on the LCD on the back of your camera. It is not a reliable guide to the best exposure. At night the histogram is not a totally reliable guide either. So it is important to bracket your exposures by shooting several different shutter speeds, even if the images look too dark or too light on the LCD. You won’t know for sure which exposure is the best until you see the images on your computer monitor when you download the photos. More on exposure compensation is in this article.
When It Is Too Dark To Meter
As the sky gets darker it will eventually get too dark for you camera meter to do its job. That point varies from model to model. Once it is too dark for your camera meter to be reliable, you will need to follow some basic exposure guidelines. To photograph the stars in the night sky, set the camera’s ISO to 400, the lens aperture to f/4, and take photos at 8 seconds, 15 seconds, 30 seconds, and 60 seconds. Then set the ISO to 800, leave the lens aperture at f/4, and again take photos at 8 seconds, 15 seconds, 30 seconds, and 60 seconds. If the images still look too dark, got to ISO 1600 and use the same shutter speeds again. One of these exposures should give you a great image of stars in the sky, and depending on several variables (the remaining amount of twilight, a sliver to quarter moon in the sky, reflective clouds) the possibility of some nice light on the snow.
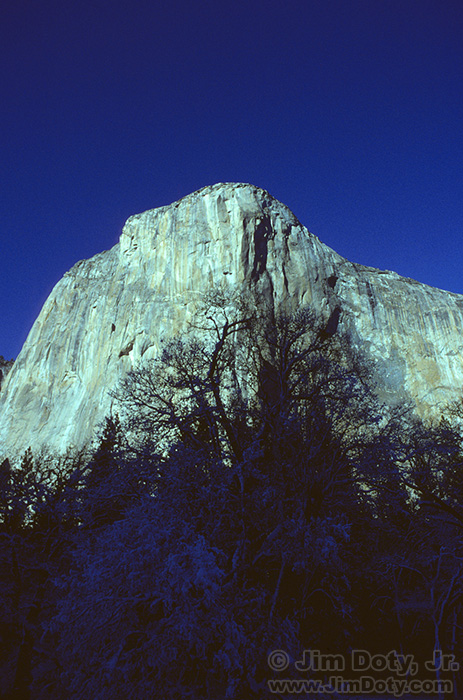
ANU-23. El Capitan in the Moonlight. Yosemite Nationla Park, California. Dec 30, 1990. Full moon. Canon F-1(1). Kodachrome 25.
Rule of 500
Depending on your lens focal length, you may have an objectionable amount of star trailing in your image. The earth is rotating so the stars will move in your long night time photos. You can minimize the amount of star trailing by using the “Rule of 500”. Divide 500 by the lens focal length you are using to get the longest “safe” shutter speed in seconds.
For a 50 mm lens, 500/50 = 10 seconds.
For a 28 mm lens, 500/28 = 18 seconds.
For a 24 mm lens, 500/24 = 20 seconds.
For a 20 mm lens, 500/20 = 25 seconds.
For a 15 mm lens, 500/15 = 33 seconds.
If you are pointing your camera at the northern sky (in the Northern Hemisphere), you can increase these shutter speeds by about 50%. With long shutter speeds you will have a bit of star trailing using the Rule of 500, but it is not what many photographers would consider objectionable.
If the exposure recommendations above give you more star trailing than you want, you will need to use a higher ISO setting. For example, if you are using a 24 mm lens, your maximum shutter speed is about 20 seconds, so some of the night sky exposure recommendations farther up the page won’t work. Try ISO 1600, f/4 and shutter speeds of 4 seconds, 8 seconds and 15 seconds. Then switch to ISO 3200, f/4, and shutter speeds of 4 seconds, 8 seconds and 15 seconds.
Rule of 600?
In the good old days people used to use the Rule of 600. But with better equipment and sharper lenses, people are generally more fussy about star trailing. If the rule of 600 works for you, go ahead and use it. It works the same way as the Rule of 500 except you divide the lens focal length into 600 to get the longest usable shutter speed without star trailing. With a 24mm lens your longest shutter speed would be about 25 seconds. Which rule you use depends on how fussy you are about star trailing.
Help, I Can’t See Through the Viewfinder
As it gets darker, you won’t be able to see much through the camera’s viewfinder, maybe a very few of the brightest stars, and maybe nothing at all. If you like the composition you picked when you first started shooting at twilight, just leave your camera as is. If you want to point your camera somewhere else, you are going to have to point and guess (or point and pray). Take a few photos, look at the results on the LCD, and move the camera a bit if you aren’t getting quite the scene you wanted. If your camera has a “live view” mode you can turn it on to check out the composition but only a few cameras will be able to will show you what the camera is seeing before you click the shutter. Nighttime photography is just too dark for most cameras to see.
If your camera is one that CAN see the night sky, you can turn on live view focus magnification and focus on a bright star.
Star Trails
Long curving star trails across the night sky can be very impressive. Set your camera up exactly as you would for a photo of non-moving stars. Set the ISO to 100 and the lens aperture to f/4 or f/5.6. Take pictures that are 15 minutes, 30 minutes, 60 minutes and longer. The longer the shutter is open, the longer the stars will trail. Longer focal lengths will also give you longer star trails (and show you less of the night sky), The only limit on the time the shutter is open is the amount of ambient light in the sky from distant city lights or the presence of the moon. Distant city lights will cause a hazy glow called “sky fog”. Too much moonlight and the snow will start to wash out and the sky will get too light. You will have to experiment to see what works for your location.
To photograph star trails you want the sky to be as dark as it can be, which means long after sunset (technically speaking, after astronomical twilight) and as far from city lights as you can get.
If you point your camera at the north star, the star trails will make semi-circles.
Moonlit Snowscape
The full moon shining on snow can make for a very nice landscape. When the full moon is high in the sky, try these one or more of these sets of exposures. Do not include the moon in the photos because the moon will be washed out.
ISO 100, f/4, shutter speeds of 30 seconds, 1 minute, 2 minutes.
ISO 200, f/4, shutter speeds of 15 seconds, 30 seconds, 1 minutes.
ISO 400, f/4, shutter speeds of 8 seconds, 15 seconds, 30 seconds.
ISO 800, f/4, shutter speeds of 4 seconds, 8 seconds, 15 seconds.
ISO 1600, f/4, shutter speeds of 2 seconds, 4 seconds, 8 seconds.
Which combination should you choose? That depends on the lens focal length you are using and whether or not you want to minimize star trails. Check the Rule of 600/500 section above. For example, If you are using a 20 mm lens and don’t want star trails (maximum shutter speed of 30 seconds), you should use the ISO 400 exposure settings. The higher the ISO setting, the more digital noise you will have in your photos, so use the lowest ISO setting that will give you the shutter speeds you want to use.
If you want star trails in the sky above your moonlit snowscape, try one of these sets of exposures. The longer the shutter speed and the longer your lens focal length, the longer the star trails will be.
ISO 100, f/8, shutter speeds of 1 minute, 2 minutes, 4 minutes.
ISO 100, f/11, shutter speeds of 2 minutes, 4 minutes, 8 minutes.
ISO 100, f/16, shutter speeds of 4 minutes, 8 minutes, 15 minutes.
Twilight, Rocky Mountain National Park
The photo at the top was taken at 6:43 pm on February 26. Sunset was at 5:49 pm and Nautical Twilight was at 6:49 pm. I was close enough to nautical twilight that the brighter stars were out but there was still enough blue in the sky to give me just the look I wanted. With an ISO of 400, the aperture was f/6.3 and the shutter speed was 30 seconds. Nautical twilight is a beautiful time to do star photos (see The Photographer’s Ephemeris below). In the bottom left corner of the sky there is some sky glow from the lights in the Denver metropolitan area.
For those of you who are curious about the night sky, the constellation Taurus is at the top center of the photo with the V shaped star cluster Hyades and the tightly packed star cluster Pleiades. Below and to the left of Taurus is the constellation Orion, probably the best know winter constellation and one of the most popular to photograph. Below and to the left of Orion is Sirius, the brightest star in the sky, which is in the constellation Canis Major.
The photos above and below were taken from the parking lot at the Moraine Park Visitor’s Center in Rocky Mountain National Park. It is a great spot to do night sky photography with a number of trees to frame your photos.
Reciprocity
No doubt you have noticed there is a mathematical relationship between the exposure recommendations above. A one stop increase in the ISO means a one stop decrease in the shutter speed. A two stop decrease in the aperture means a two stop increase in the shutter speed. There are literally dozens of ISO, aperture, and shutter speed combinations that will give you the exact same exposure but very different artistic looks. This is called reciprocity. It is a powerful tool that most photographers never fully take advantage of. There are some articles linked below that can get you started. And if you want to master reciprocity and exposure, my exposure book is linked below.
The Photographer’s Ephemeris (TPE)
TPE is a great tool for outdoor photographers. It is available for Android, iOS (iPhone, iPad, iPod Touch), and for your computer. You can pick any place on the planet and any date, and it will show you when the sun and moon will rise and set. It will also show you the directions they will rise and set from your chosen location using a satellite image. It will also tell you the times for Civil Twilight (the sun is 6 degrees below the horizon), Nautical Twilight (the sun is 12 degrees below the horizon) which is an a great time fora photo like the one above, and for Astronomical Twilight (the sun is 18 degrees below the horizon). For really dark sky photography (which includes star trails), you want to be out shooting after astronomical twilight in the evening and before astronomical twilight in the morning.
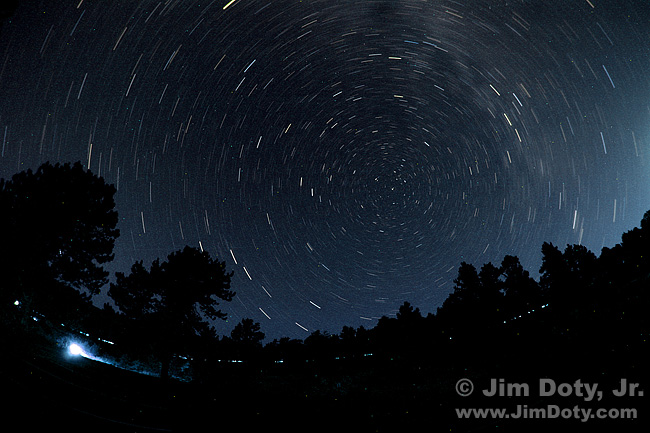
Star Trails, Rocky Mountain National Park. The Big Dipper is just above the trees to the left of center. Click for a larger version.
Twilight Photo Data: Canon 5D. Canon EF 15mm f/2.8 lens. 30.0 sec, f/6.3, ISO 400. February 26, 2008. 6:43 pm local time.
Star Trails Photo Data: Canon 5D. Canon EF 15mm f/2.8 lens. 1024 seconds (a little over 17 minutes), f/4, ISO 100.
Originally posted January 26, 2015. Revised and re-posted January 27, 2023.
Winter Photography Series Links
“How To” Series: Winter Photography – An Overview with links to the articles
Related Article Links
The Best National Parks to Photograph in Winter
One Photographer and Nine Outdoor/Travel Writers Pick the Best Winter National Parks
“How To” Series: Snowy Owl Photography
More Article Links
How To Focus Your Lens on Infinity for Night Photography
How To Get Critical Focus in “Live View” Mode with a Magnified Image
Why Is Exposure So Important? The first in a series of articles covering the basics of exposure with links to the rest of the articles.
Speaking Your Camera’s Language: Aperture, Shutter Speed, and ISO (thinking in stops).
Using Reflected Light Meters, Part One (with a section on exposure compensation).
Book Links
The Best Night, Astronomy, and Astrophotography Books. If you really like photographing the night sky, whether it is the simplest stuff or the most complex, this article will introduce you to the books that will guide you along the way.
If you just like to look at the night sky and want to know what’s up there and where to look, I recommend some books for that too. My favorite is Nightwatch: A Practical Guide to Viewing the Universe by Terence Dickinson, Adolf Schaller, Victor Costanzo, and Roberta Cooke. Any recent version of Nightwatch will do. This is my favorite guide to viewing the night sky with naked eyes, binoculars, or a telescope. It is not a photography guide.
Nature Photography Books: The Three Essentials. If you only read three nature photography books, put these on your “must read” list.
My Two Favorite Introductions to Landscape Photography. If you only get two books on landscape photography, these are the books to get.
The Best “How To” Nature Photography Books
Mastering exposure is one of the first and most important steps to becoming a better photographer. One of the best ways to do this is to read Digital Photography Exposure for Dummies and do the exposure exercises in the book. This book will teach you the basics and then take you well beyond the basics. Digital Photography Exposure for Dummies is one of the highest rated photography books at Amazon.com (5 stars) and it praised by amateurs, professional photographers, and photography magazines as one of the most helpful and comprehensive books on exposure currently available. You can learn more here and order it at Amazon.com.
Computer, Tablet, and Smartphone Apps
The Photographer’s Ephemeris. A smart phone, tablet, and computer guide to when the sun and moon will rise and set from any place on the planet and any date you choose, as well as times for civil, nautical, and astronomical twilight.
Planets is a good iPhone app to show you where the stars and planets are in the night sky. The default setting is to show you the sky from your current location and time. You can go into Options, turn Automatic Date and Time off, and then change the date and time so you can check out the night sky in the future or past. You can also turn Automatic Location off and enter the GPS coordinates of your choice.
Location Link
Rocky Mountain National Park – the official NPS web site.

