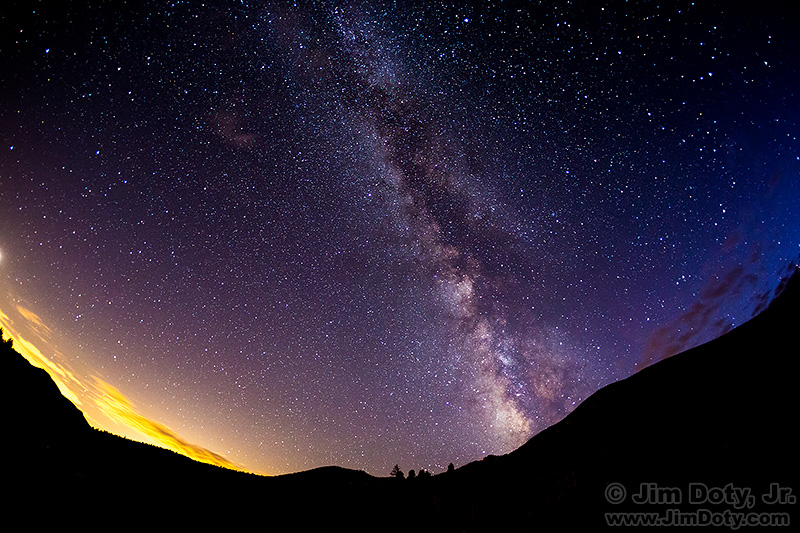
The Milky Way from Horseshoe Park, Rocky Mountain National Park. The golden glow is from Denver city lights 70 miles away. The blue hues of late twilight are fading in the west. Click for a larger image.
On all of my weekend nature photography workshops, weather permitting I take everyone out once or twice to photograph the night sky. For those who haven’t tried it before, it kicks down the door to a whole new realm of photographic possibilities, and not just for night photography. Once a photographer tries one thing that is totally new and different and ends up with beautiful images they are proud of, they are ready to try all kinds of new things.
In September I lead a photography workshop at Rocky Mountain National Park. On Sunday night we were in Horseshoe Park to photograph the lunar eclipse of the “Super Blood Moon”. The sky was dark enough, at least away from the direction of the Denver city lights, that we could photograph the Milky Way.
A dark sky is the key. I prefer to be 100 miles from the nearest big city. Denver is about 70 miles away from Rocky Mountain National Park, and other cities along the Front Range of the Rockies are even closer, some glow from city lights is inevitable to the southeast. But things are pretty dark to the southwest, west, and north.
To photograph the Milky Way you need a sturdy tripod and a camera that has a large sensor (preferably APS-C size or larger), high ISO settings (1600 or 3200), and shutter speeds up to 30 seconds. You will also need a relatively fast (f2/8 or f/4) wide angle lens (the wider the better) that will focus manually, and has a distance scale on the lens. It is also helpful to have a red headlamp or a flashlight with a red filter so you don’t mess with your eyes dark adaptation to the night sky.
A tripod holds your camera steady for the long exposures and allows you to compose accurately through the viewfinder. In a pinch you could lay your camera on the ground, the roof of your car, or lean it up against something like your camera bag (see the second photo and commentary in this article) but you have less control over what your camera is seeing.
A fast lens keeps your exposure times reasonable, as does a high ISO setting on your camera. Larger digital sensors have larger photosites which provide a cleaner, less noisy image. Smaller photosites are noisier.
Put your camera on a tripod, point it at the Milky Way, and manually focus your lens on infinity. Infinity focus is critically important to all night photography. At night it is too dark for your eye to reliably manually focus or for your camera to autofocus. Use the distance in your lens scale to find infinity. If you are using a zoom lens, keep in mind that your lens can focus past infinity which will give you blurry pictures, so you need to know where infinity is on your lens. You can determine this during day by focusing on something at infinity and the distance scale on your lens. If your lens doesn’t have a distance scale your life will be more complicated. Focus on infinity during the day, take a picture and zoom in on the LCD to make sure infinity is critically sharp in the photo, then tape your focus ring in place so it doesn’t move and wait for the stars to come out. Use gaffers tape so the tape doesn’t gum up your lens with a sticky residue.
Set the aperture to f/2.8 or f/4, your shutter speed to 15 or 30 seconds, and the ISO to 1600 or 3200 and take a picture. If the image is too dark, use a longer shutter speed or higher ISO. If it is too light use a faster shutter speed or a slower ISO. If your shutter speed is too long for the focal length your are using, you will get star trails. That isn’t always a bad thing, but it is for a clear image of the Milky Way. If you get star trails use a shorter shutter speed. Experiment with your exposure settings.
If you zoom in on an image and the stars look like fuzzy round balls, your focus is off. Turn the focus ring every so slightly and try again. If the stars get bigger, turn the focus ring every so slightly the other direction. Like just about everything else, the more you do this the better you will get.

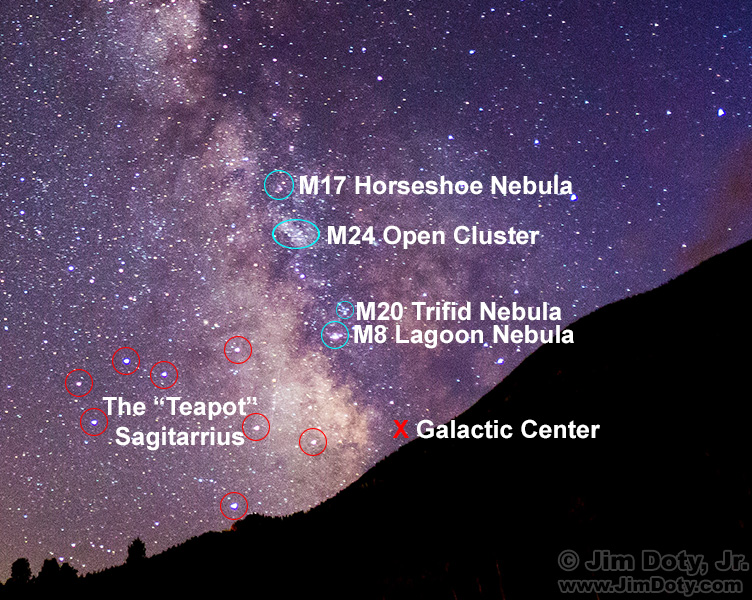
A portion of the image at the top of this article with the galactic center, the Teapot, and a few popular Messier objects labeled.
When you look at the Milky Way just above the horizon in this image, you are looking toward the center of our galaxy. If you are an astronomy buff, I marked the galactic center with a red X, the stars of the “Teapot” in Sagittarius with red circles, and a few of the many Messier objects in this image.
I did a horizon to horizon image of the Milky Way the same night I took this photo.
It is not unusual for the sky to look red in a long digital exposure. That is what digital sensors tend to do. In your computer you can correct for this by opening your RAW file in Adobe Camera Raw and use the Temperature and Tint sliders.
Photo Data: Milky Way from Horseshoe Park, Rocky Mountain National Park, Colorado. September 27, 2015. 8:06:12 PM MDT. Canon 5D Mark III. Canon EF 15mm f/2.8 lens. 30 sec, f/2.8, ISO 3200.
Links
How To Focus Your Lens on Infinity for Night Photography
The “Super Blood Moon” Lunar Eclipse
The Milky Way, Horizon to Horizon
To learn more about night and low light photography, read Digital Photography Exposure for Dummies, one of the highest rated photography books at Amazon.com. Learn more here and order it here.
Article: The Best Astrophotography Books
